
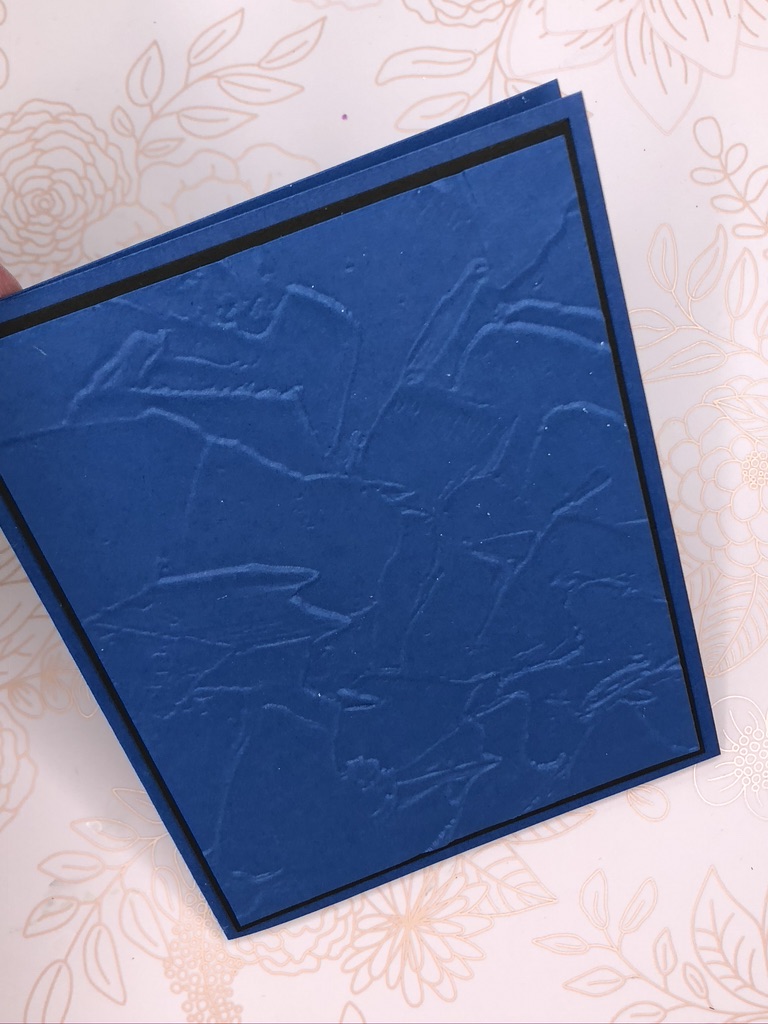
This blog post is special. It represents 3 weeks of work to create a masculine set of cards and a feminine set of cards, 6 cards/set, each set with a theme but without duplicate design. They are then presented in gift packaging. The final part of this challenge was to incorporate something recycled. As you can imagine, this is not a typical blog post.
This blog will be lengthy. More like a retreat than a blog. Let’s call it the story of my journey through this challenge. Because the blog is lengthy, get comfortable: turn off the phone, put the dog outside, send the husband and kids away (no…not forever, just for the afternoon…sorry!), light a candle, grab some coffee or a glass of wine, and indulge yourself with something special! Even stamp along with me…


Here are the two card sets. I will go through each of them individually in just a bit. But first I want to share some my design tips.
- I tend to never fully copy a card from another stamper. Oh sure, I have in the past, and it is actually an accepted practice in the stamping world – considered a compliment even, but it is not my typical design style. (I will remind you that if you do CASE a card please remember to give credit to the original designer). I do, however, look at cards from other designers for ideas and inspiration – all the time. This comes in the forms of color combinations, page layouts, combinations of techniques. Look for these on Pinterest and on the internet – search the stamp name and company in google then select ‘images’. It is a whole new world of creativity and ideas.
- Don’t be afraid to be creative or try something new, scratch or change an idea, think outside the box, let your ideas flow. This is the best design tip I can give: Have fun! After all, isn’t this why we are here?
- When making sets: choose a set theme. The masculine set theme is “black and blue” This opens up the design to basically anything I want, but makes the set look like the cards belong together. The cards in the feminine set each have an element from the Altenew stamp set “Wild Hibiscus”. This set is amazing and has endless possibilities. Actually, every stamp set has endless possibilities – the only limits are on how willing you are to dare to be creative.
I have been taking the Aletnew Education Certification Challenge. This blog is my “final exam” for Level 1 of the classes. Yup…we all remember finals…but this one was fun! I want to share at least 3 components from the classes in Level 1…if I’m learning, why not pass it along?
- Irresistible Inking Techniques: With this I used inks in ways “outside the box”. The “box” would be to apply ink with a stamp. There are several cards where I spread ink either in spatter, with an acrylic block, or even using kitchen plastic wrap.
- Ink Blending Techniques…moving ink around with a blending tool.
- Let It Shine. What? No glitter? No way! I have to have bling and glitter and embossing powder. Anything to make it shine.
- For The Guys. Well, OK, this one was obvious. (almost cheating, right???)
OK, I hear you, enough of the intro…let’s get stamping…the blog will be in three distinct parts: Masculine cards, Feminine cards, and the gift packaging.
PART ONE: Masculine Set (For the Guys…)
The Theme is “Black and Blue” Everything else if free for all… 🙂
CARD ONE: HAPPY BIRTHDAY
I am staring with my favorite. I hope you enjoy it too:

- Stamp sets:
- Altenew Stunning Cosmos, Altenew Modern Art Deco Alpha, Altenew Halftone Squares
- Inks:
- Altenew Persian Blue Crisp Dye Ink, Versamark Watermark Stamp Pad, Black embossing powder, white embossing powder
- Card Stock:
- Basic Black, Neenah White, Stampin’ Up! Blueberry Bushel
- Other supplies:
- Foam tape, Altenew Halftone Cover Die, Heat gun, glue, blending brush


You will see the gradient color behind the die cut black card stock which was created using the Altenew Halftone Cover Die. This gradient color was made by blending Altenew Persian Blue Crisp Dye Ink onto Neenah white card stock going from dark to light, using a blending brush. With the die cut black card stock over the coloring it makes a stunning effect. The die cut black card stock is glued to the blended blue card stock, then glued to another piece of black card stock and attached to a Blueberry Bushel card base.
The Happy Birthday adds a special touch. Starting with a strip of white card stock, I blended Altenew Persian Blue Crisp Dye Ink from bottom up, fading to white. I did this on a second strip of white as well which sits behind the Birthday sentiment. I then heat embossed the happy sentiment from the Altenew Stunning Cosmos stamp set. This is glued to a thin strip of black card stock and popped up off the card with foam tape. The Birthday sentiment was heat embossed with white on black card stock using the Altenew Modern Deco Alpha stamp set. I have lots of individual lettering stamp sets. This is the easiest set I have ever used to spell out a word and have it look so perfect. It’s a must have! This sentiment is glued onto the blue blended white card stock, then onto a piece of black card stock and attached to the card with foam tape.
CARD TWO: HAPPY BIRTHDAY (Argyle style)

- Stamp sets:
- Altenew Modern Deco Alpha, Altenew Pattern Play Diamond, Altenew Stunning Cosmos.
- Inks:
- Stampin’Up Blueberry Bushel embossing powder, White embossing powder, Versamark Watermark Stamp Pad.
- Card Stock:
- Stampin’Up! Blueberry Bushel, Basic Black, Stampin’Up! Seaside Spray card stock
- Other supplies:
- Foam tape, heat gun

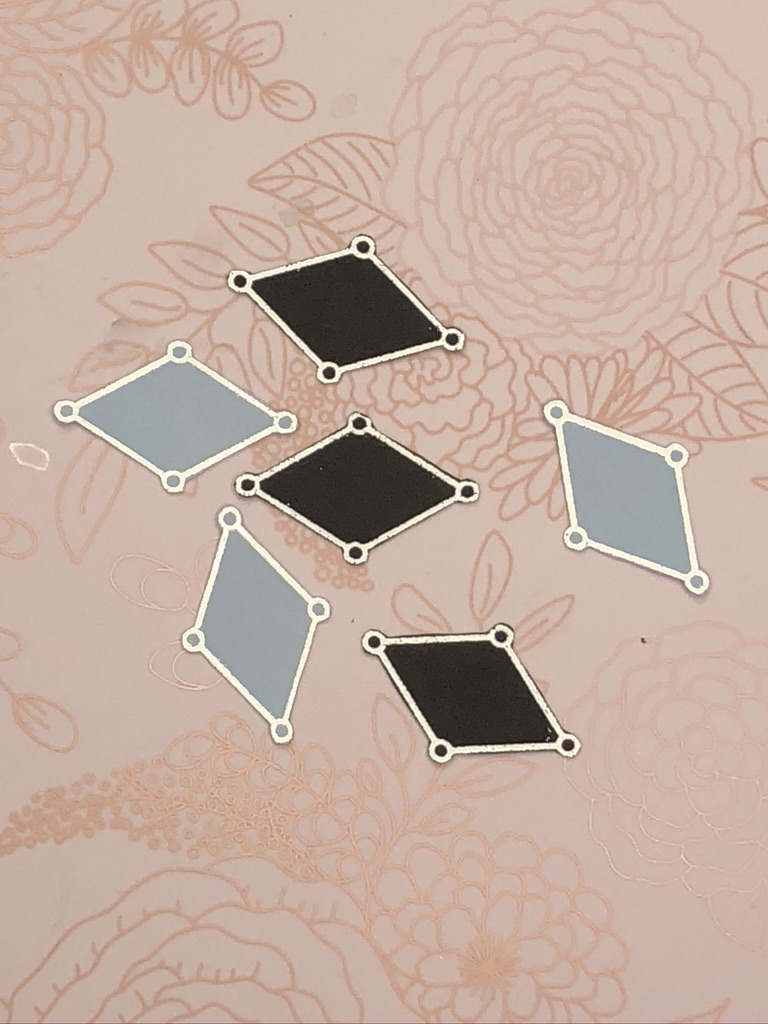
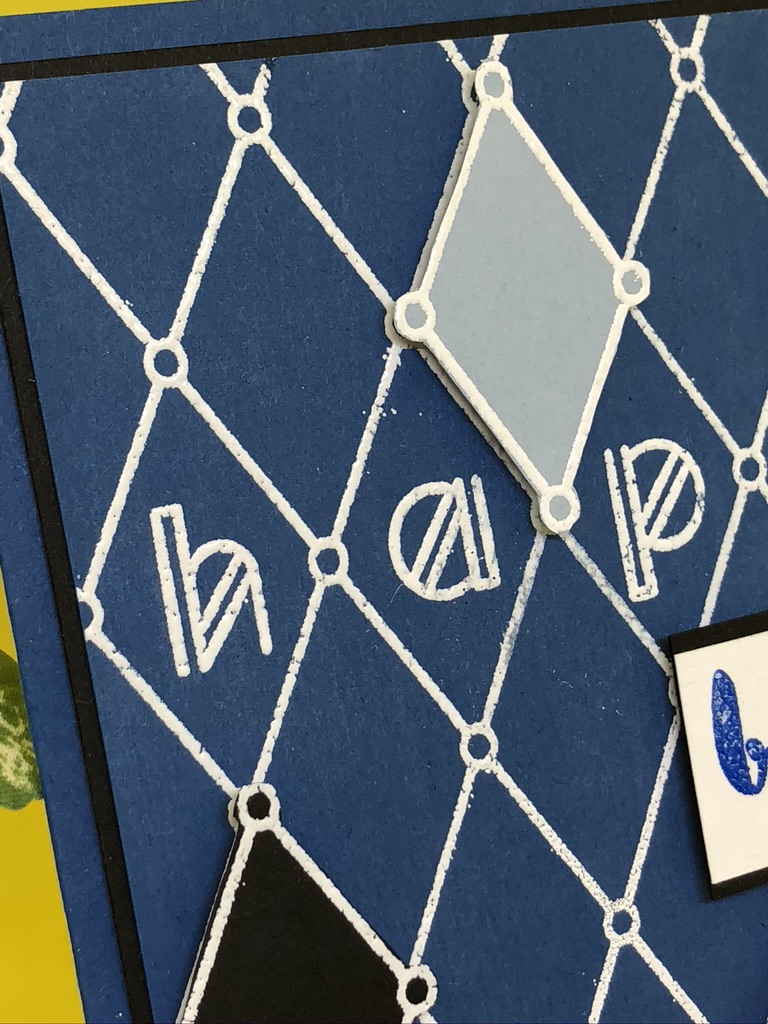
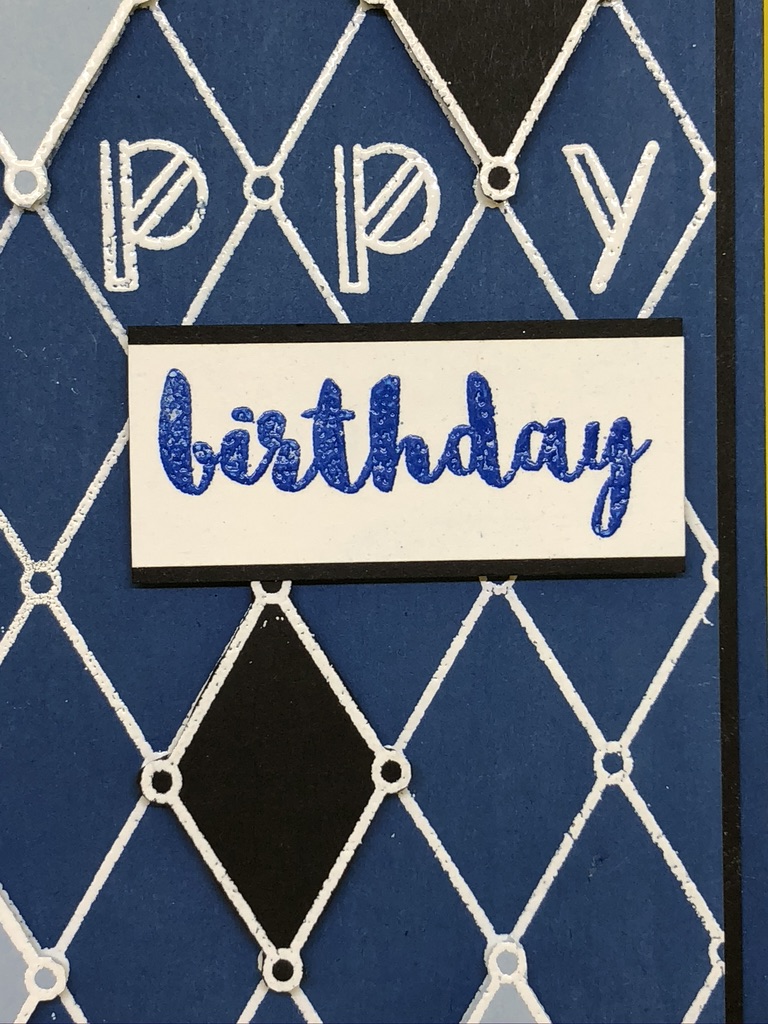
This was such a fun and “simple” card to make. **TIP**: when embossing for a large background, start with a larger than needed piece of card stock. Here I used the Blueberry Bushel card stock embossed in white embossing powder. Once cooled, cut it down to the desired size and to desired edge design. Often the edges of larger embossed pieces are not crisp or perfect. Starting with a larger piece of card stock than needed helps to end up with a more perfect product. Here is another **TIP**: when embossing on colored card stock: use a stamp positioning tool such as a MISTI. The colored card stocks seem to absorb the Versamark Ink more than white card stock, making the Versemark less sticky. I find I need to re-ink with Versamark 3-4 times to get an even distribution of Versamark and therefore a nicer image. And ALWAYS use a powder tool to prevent extra embossing powder where you do not want it. I embossed happy with the Altenew Modern Deco Alpha set. I then embossed the same image on black and Seaside Spray card stock, fussy cut out several pieces and attached them to the background with foam tape. The Birthday was heat embossed Blueberry bushel embossing powder onto Neenah white card stock, attached to a piece of black card stock, and attached to the card using foam tape.
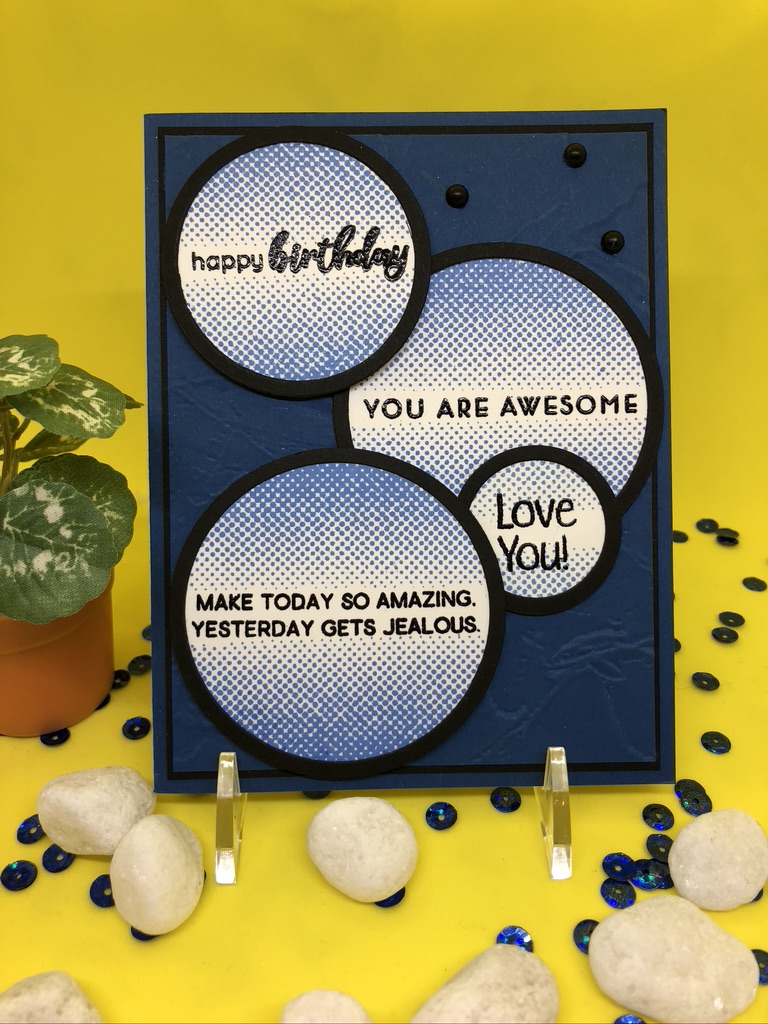
CARD THREE: HAPPY BIRTHDAY, YOU ARE AWESOME
- Stamp sets:
- Altenew Amazing You, Altenew Halftone Squares, Altenew Dotted Blooms, Altenew Painted Butterflies, Altenew Heartfelt Sentiments
- Inks:
- Altenew Persian Blue Crisp Dye Ink, Versamark Watermark Stamp pad, Black embossing powder.
- Card Stock:
- Stampin’Up! Blueberry Bushel card stock, Neenah white stock, basic black card stock.
- Other supplies:
- Stampin”Up! matt black dots, Stampin’Up! Layered Circle Dies, Stampin’Up! Painted Texture 3D embossing folder, foam tape, heat gun


The Stampin’Up! Painted Texture 3D embossing folder has become a favorite. It is rustic, beautiful and versatile. It creates the background for this card. Using the layering circles I cut out 5 circles of varying sizes from Neenah white card stock and 5 rings to match the circles from black card stock. I then heat embossed the sentiments in black embossing powder. Using the Altenew Halftone Squares stamp, I stamped above and below the heat embossed sentiments in Blueberry Bushel ink. Before glueing the black rings to the stamped and embossed circles, I fussy cut trimmed about a millimeter (thats 1/16″ or less) from around the circles. This is not necessarily a required step, but I found it was easier to fit the black rings on the circles with less of the white circles showing on the outside of the rings. I arranged the circles how I wanted them on the card, then attached. Some are glued directly, some are attached with foam tape. I added the 3 matt dots for added interest. **TIP**: I always glue down embellishments, even if they come with adhesive backing. The background is then glued to a piece of black card stock which is then glued to a Blueberry Bushel card base. **TIP**: You may notice I do not use double sided sticky tape of any kind. Have you ever received a hand made card from a friend only to find it was a puzzle – assembly required? Yup…no mare double sided tape for me!
OK…10 minute break: fill the coffee mug…stretch…check the dog…come on back for more…
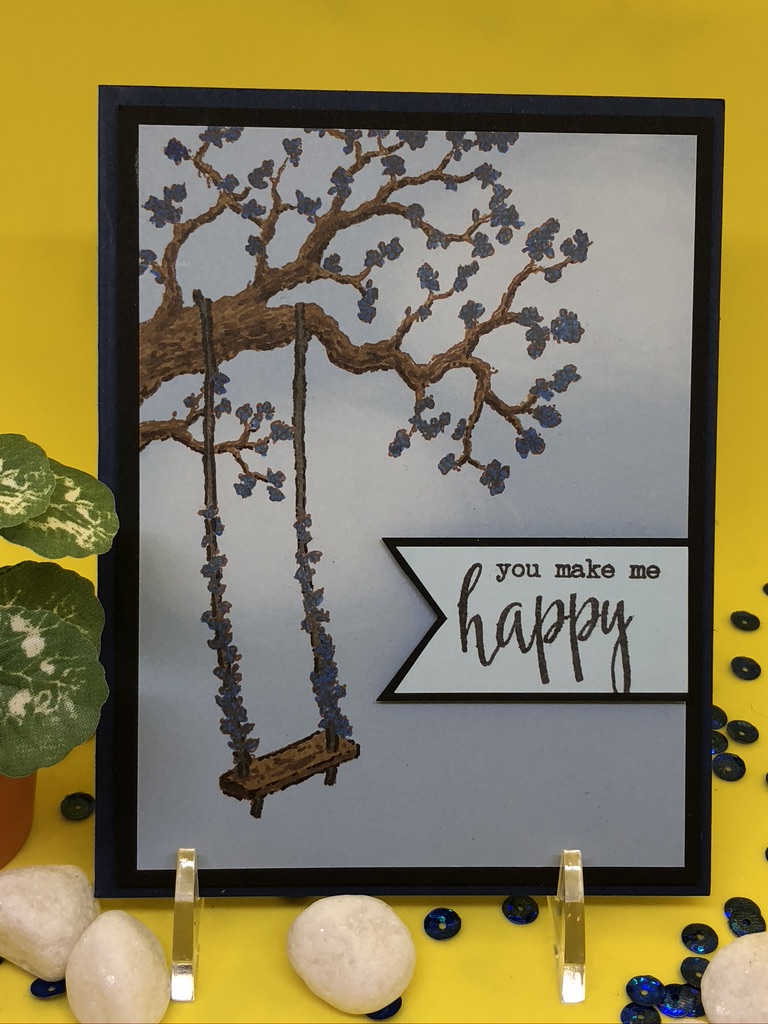
CARD FOUR: YOU MAKE ME HAPPY
- Stamp Sets:
- Altenew Moments in Time, Altenew Painted Poppy
- Inks:
- Snow Storm Pigment Ink from CC designs Rubber Stamps, Altenew Expresso Crisp Dye Ink, Altenew Jet Black Ink, Copics: E35, E47, E79, W7, W9, B26
- Card stock:
- Stampin’Up! Night of Navy, Stampin’Up! Seaside Spray, Basic black card stock.
- Other supplies:
- Ink Blending tool, foam tape


This card is really just stamping and coloring. I started with creating the clouds using a foam blending tool and the Snow Storm Pigment Ink on Seaside Spray card stock. I then stamped the image from Altenew Moments in time in Altenew Expresso Crisp Dye Ink and matched the color with the Copics I was using to get a no-line stamping effect. Color away…Keep the darker colors to the shaded parts of the branches for a more 3-D realistic effect. The sentiment “You make me happy” was stamped on Seaside Spray card stock, the left edge was fussy cut to make the indented edge, this was glued to a piece of black card stock, again fussy cutting to make the indented edge. This was attached to the card with foam tape. The front panel was then attached to back card stock, and using foam tape, attached to a card base of Night of Navy card stock.
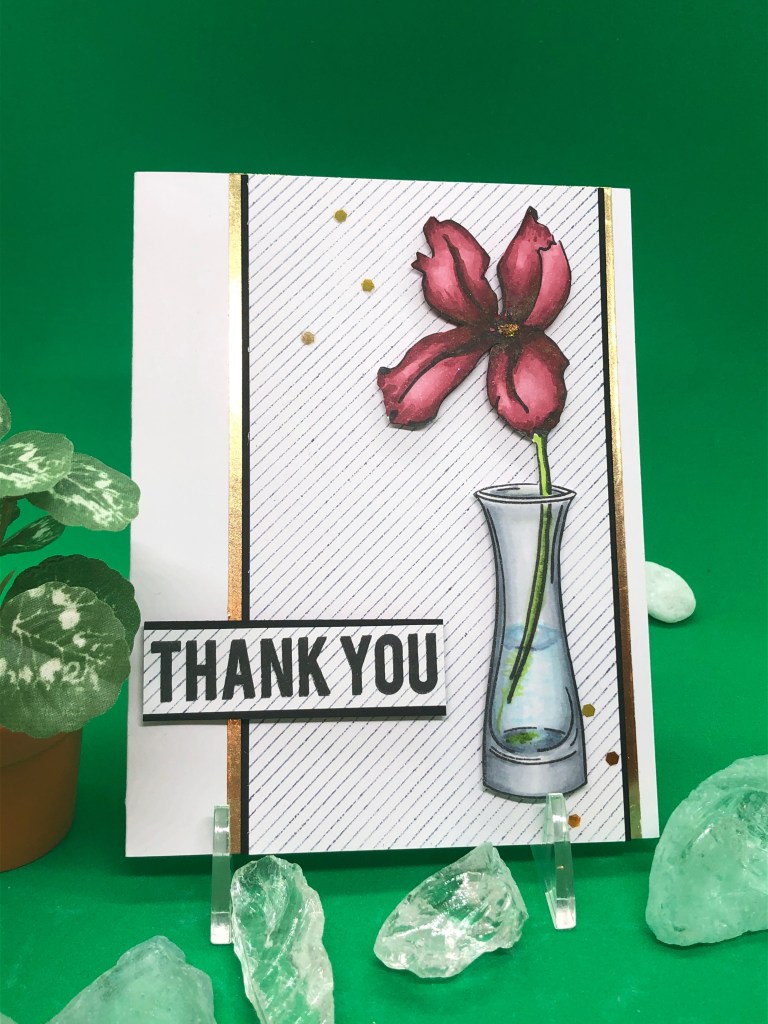
CARD FIVE: THANK YOU

- Stamp Sets:
- Altenew Pinstripe, Altenew Many Thanks
- Inks:
- Back Embossing powder, Versamark Watermark Stamp pad
- Card Stock:
- Back black card stock, Stampin’Up! Seaside Spray card stock, Stampin’Up! Blueberry Bushel card stock
- Other supplies:
- Stampin’Up! Layering Square Layered Dies, Black rhinestones, foam tape, heat gun

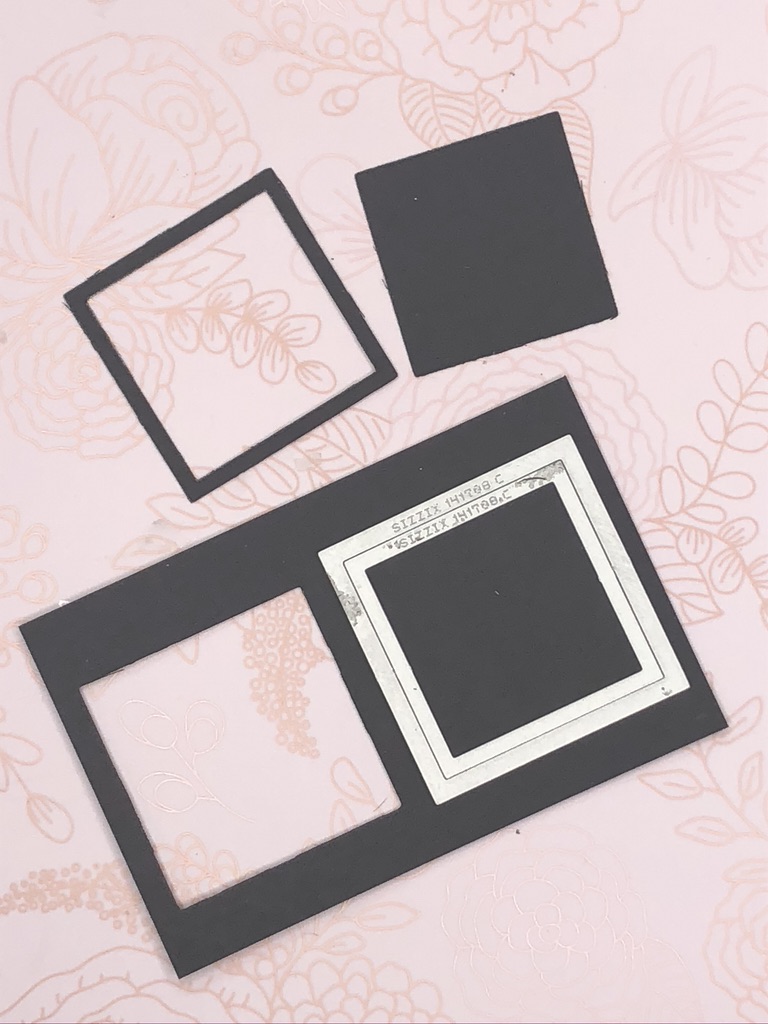
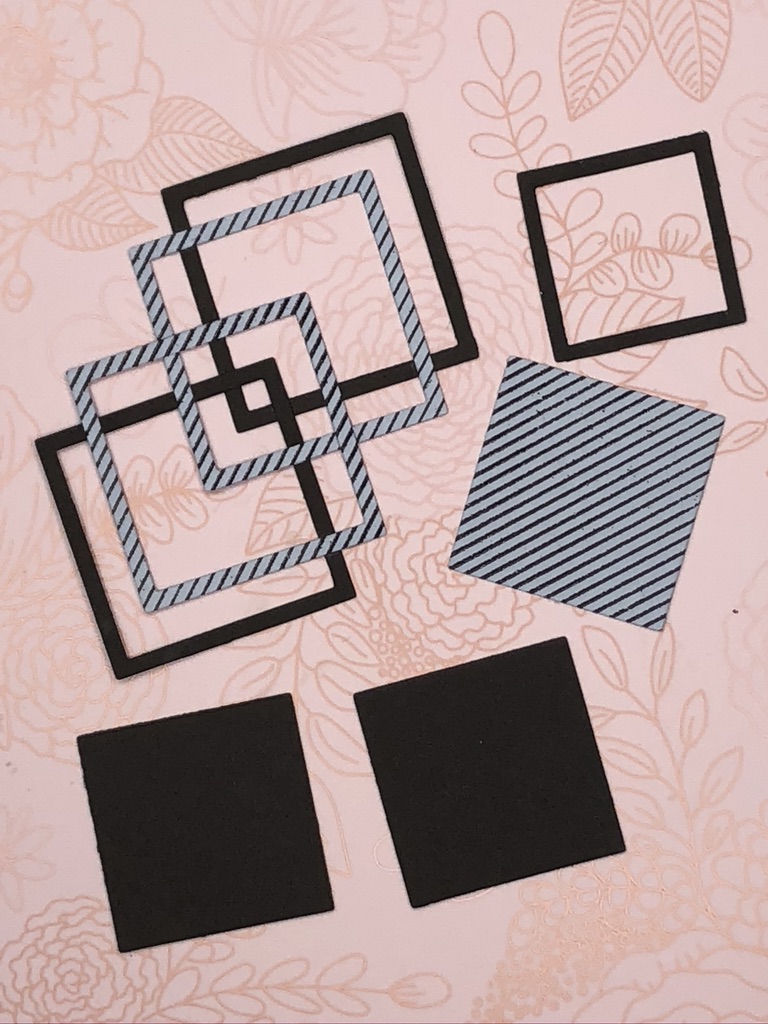
There is some preparation to buidling this card. Start by making the black embossed striped background on Blueberry Bushel card stock. Remember the **tip**: use your MISTI when applying Versamark Ink and start with a larger piece of card stock than needed. Emboss black stripes on a piece of Seaside Spray card stock as well. This will be used for the layering design (see these in the third picture above). Layering the dies as seen in the middle picture, cut out black squares and black square “frames”. Also cut out squares and frames from the embossed Seaside Spray card stock.


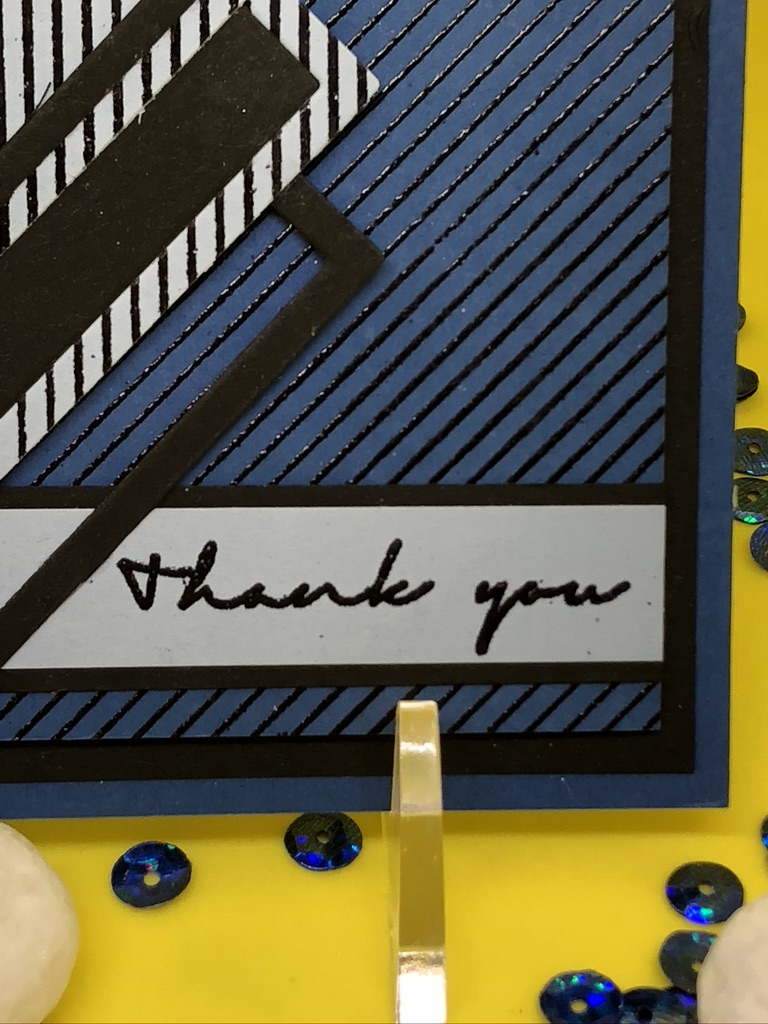
You will see in the left picture I started to build the layered design. The black squares are fit into the embossed Seaside Spray squares (see middle picture). These layers are glued flat against each other – no foam tape. The “thank you” sentiment is embossed in black embossing powder on Seaside Spray card stock. Another strip of Seaside Spray card stock, same size, is cut for the top of the card. These two strips are glued to pieces of black card stock. They are then attached to the card with glue before the built layered design is glued to the card. This background is attached to black card stock. This panel is attached to the Blueberry Bushel card base with foam tape. Black rhinestones are added to finish the look.
CARD SIX: YOU’RE SUCH A ‘FUNGI’
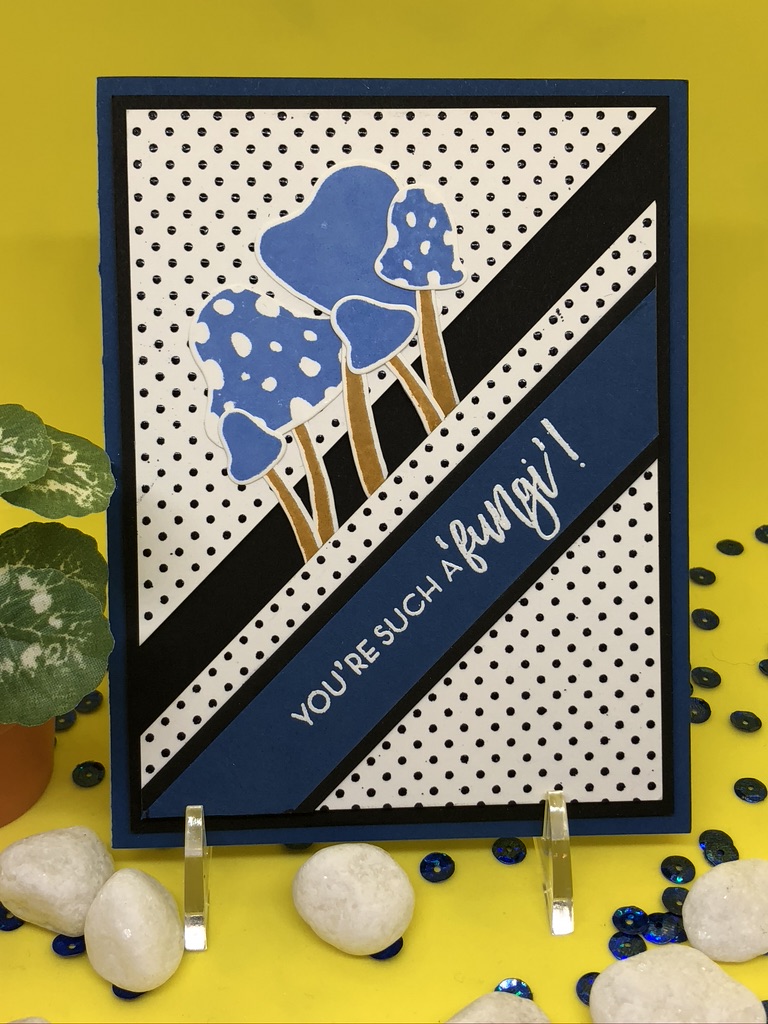
OK, this card actually got a giggle from my husband. I have that special guy who, although could never design a card because he has no interest, can still pick out a good design from a bad one. (likely his engineering background???). In any case, he is my most honest critic. I show him EVERY card (unless stamping away from home with friends) before I call a card “done”. His reaction: a cute giggle…that’s a first!
- Stamp Sets:
- Altenew Dainty Swiss Dots, Altenew Love You So Mush
- Inks
- Altenew Persian Blue Crisp Dye Ink, Altenew Sicilian Amber Crisp Dye Ink, Black embossing powder, white embossing powder, Versamark Watermark Stamp pad.
- Card stock:
- Stampin’Up! Blueberry Bushel, Basic Black, Neenah White card stock.
- Other supplies:
- Altenew Love You So Mush dies
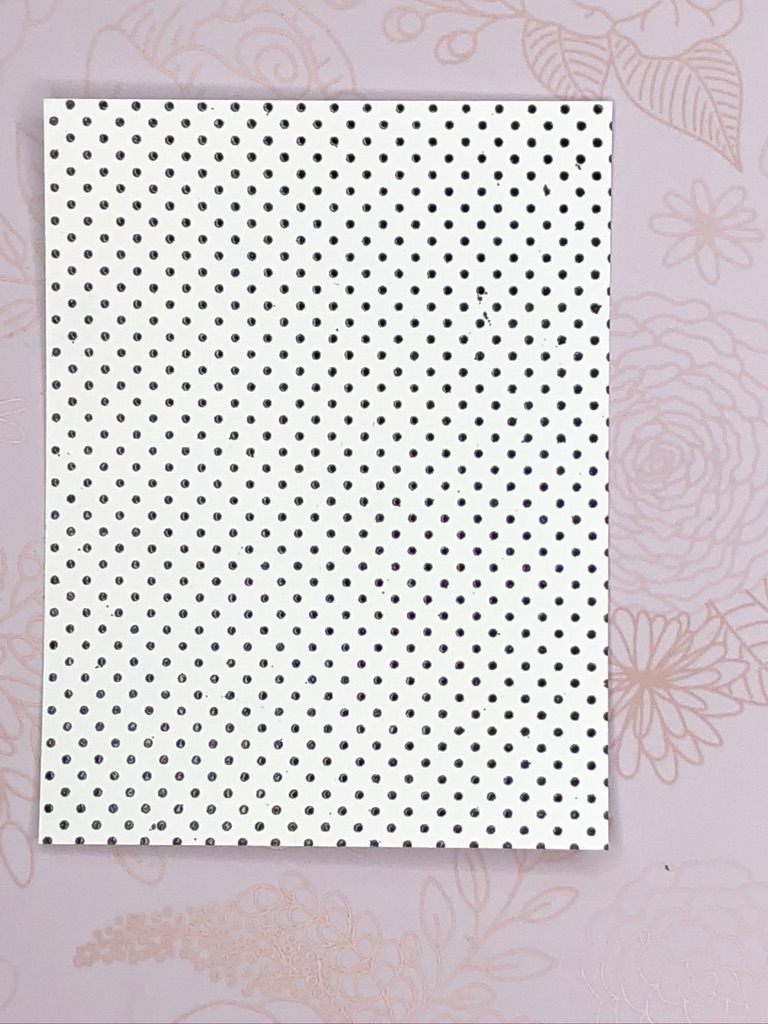

To create the background for this stamp, start by embossing in black the Dainty Swiss Dots stamp onto an over-sided piece of Neenah white card stock. Cut down to size. Using a cutter, cut out a 1/2″ strip. This is easy with this pattern of dots as you just follow one line of dots for each cut.
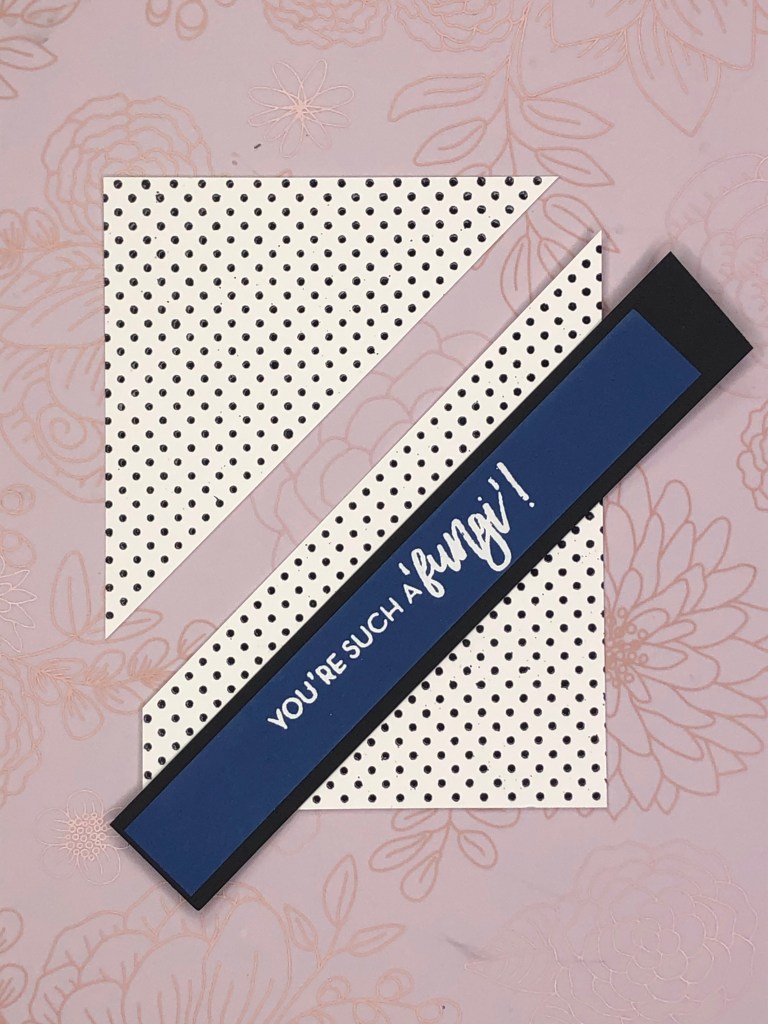

Using the You’re Such A ‘Fungi’ stamp, heat emboss this image on to a strip of Blueberry Bushel card stock. Glue this to a strip of basic black card stock. Glue this to the bottom piece of the Dainty Swiss Dots card stock as above. Turn this piece over, cut the excess off. Now you have the card front ready to complete. These two pieces are attached to a piece of black card stock using foam tape.

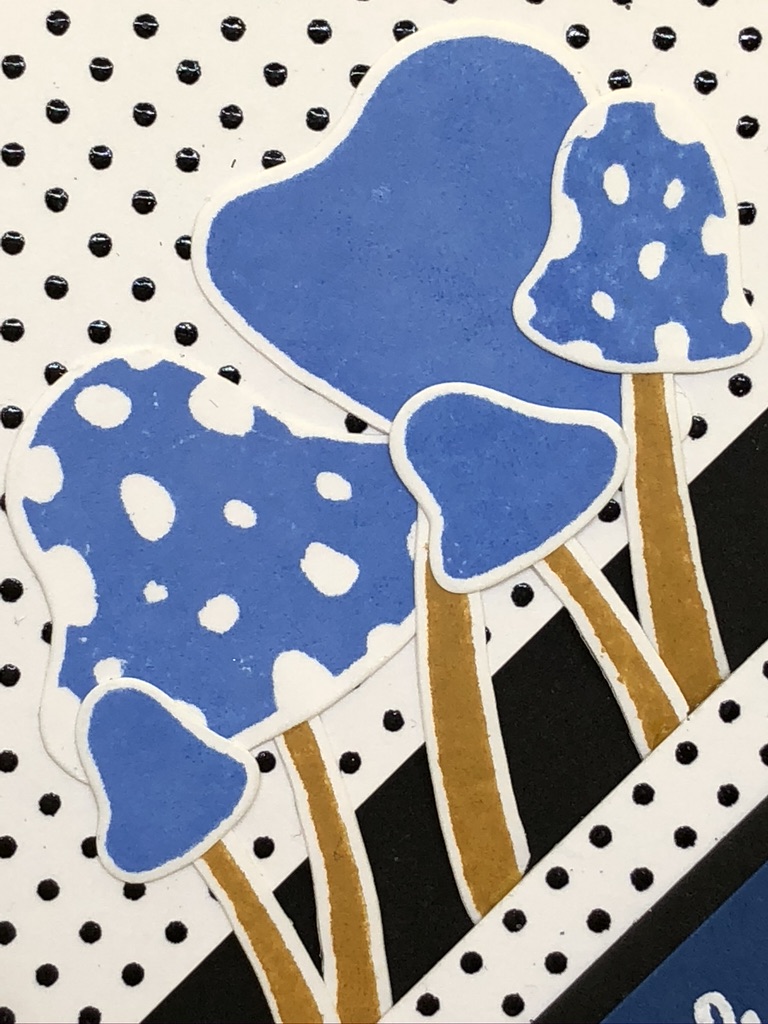
Stamp the mushrooms and stems from the Love You So Mush onto a piece of scrap Neenah white card stock using Persian Blu and Sicilian Amber Crisp Dye Inks. Using the dies for the Love You So Mush set, die cut out the images. Tuck the stems of the mushrooms under the Swiss Dots card stock, glue the upper stems and mushroom caps down in desired pattern. Attach the completed card front to a Blueberry Bushel card base using foam tape.
There are all the masculine cards. Here’s another picture…I hope you enjoyed them and found some inspiration and tips.
PART TWO: FEMININE CARDS
The Theme is “Showing Variety in One Stamp Set using the Altenew Wild Hibiscus Stamp Set”
It breaks my heart to hear a stamper say, “that set is just too expensive”. (I’ve even said it myself) What?? With imagination, every set has ENDLESS possibilities. This group of cards is proof. Each is beautiful on it’s own, but represents the versatility of one stamp set. I rarely create a card using ONLY one stamp set, and I encourage you to look at your stamp sets in that light. Mix, match, use multiple stamps from different sets. This stretches your investment and your loved ones will be the ones who benefit when they receive your beautiful cards. (Look at that – another design tip to tuck away!)
CARD ONE: THANK YOU
- Stamp Sets:
- Altenew Wild Hibiscus stamp set, Altenew Pinstripe stamp set, Altenew Versatile Vases
- Inks:
- Altenew Permanent Black Crisp Ink, Altenew Dark Night Crisp Dye Ink, Copic inks: G00, YG03, YG17, YG67, C00, C1, C2, C3, C4, BV20, BV23, BV25, B0000, B000, B00, R81, R85, R89, RV99
- Card Stock:
- Basic black card stock, Neenah white card stock, Express-It Blending White Card stock
- Other supplies:
- Foam tape, Altenew Gold Washi tape, Gold embellishments, Silver Glitter, Heat gun


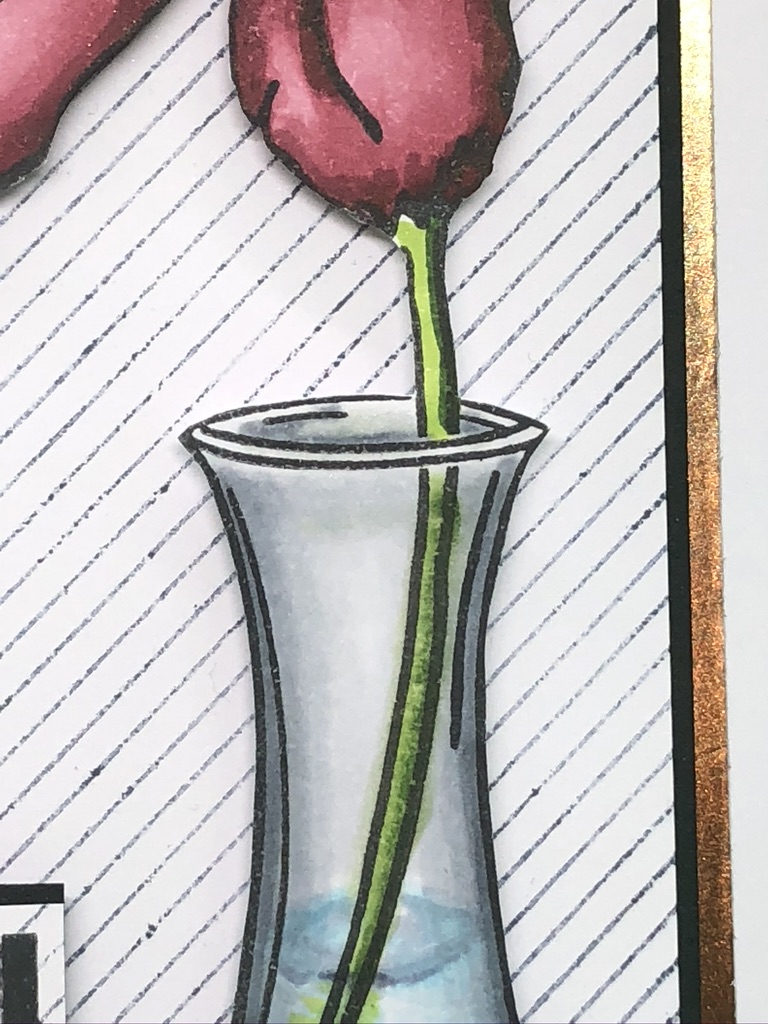
The first step I’m going to talk about is preparing the vase. Stamp the vase on the Express-It Blending White card stock. This is a fantastic card stock for alcohol marker coloring as the ink sits on top of the paper rather than quickly absorbing. The art in alcohol marker coloring is in the blending of the inks. If the ink sits on the paper, then blending is easier. There was a lot of coloring to get this vase right. It is impossible to write about it. But I’ll tell you a secret – I’m learning to how to video and how to edit the videos so my future posts will have videos attached. I worked hard to get to the point where I could add videos to this blog but alas, my outside-of-stamping life needed to continue to happen and I started running up against the posting deadline for this blog. I will absolutely do a video of this, and probably many other of the cards in this blog, and post the videos to my blog in the near future so you can see the process of coloring this vase. OK, so you will notice the middle picture. This is a technique called masking. You will notice the back rim of the vase has a gap in it. That was created using masking as well. It is simple, put a piece of ‘Post-It’ note on the card stock to “block” the part you do not want to stamp. Now look at the third picture, above. The stem of the stamp is behind the front rim of the vase, the stem of the stamp is in front of the back rim. You now have dimension. Color in the flower, and fussy cut the whole image out. It will be attached to the card front later.
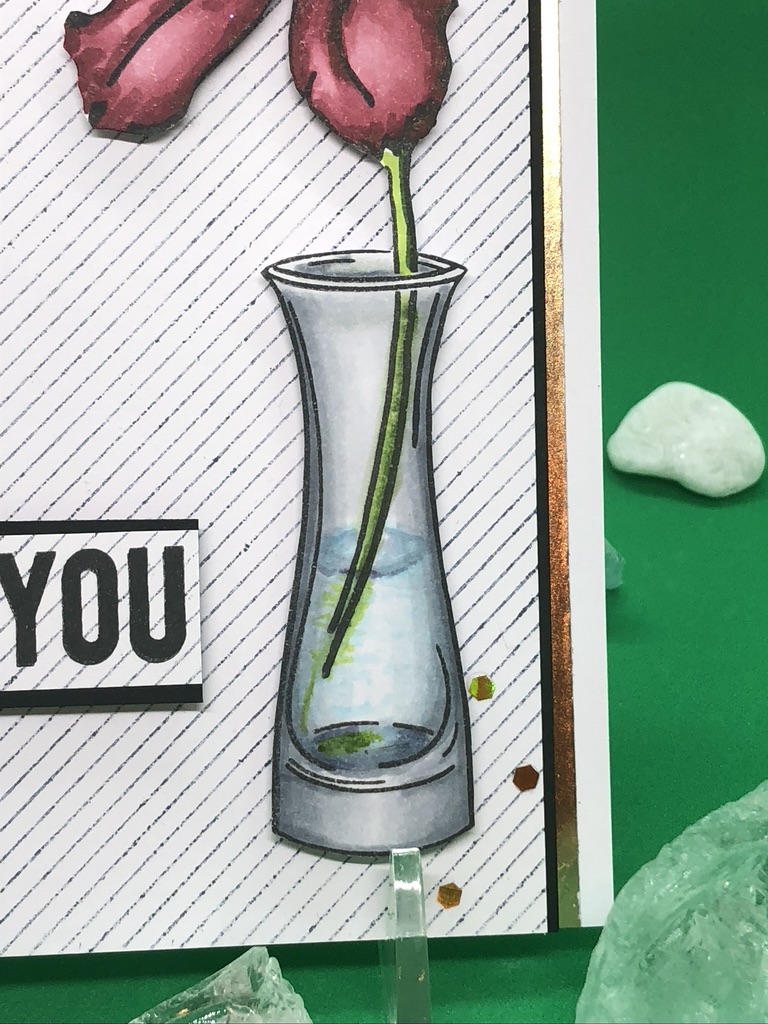
Using Altenew Dark Night Crisp Dye Ink, ink the Altenew Pinstripe stamp, then stamp-off before stamping onto the Neenah white card stock. To stamp off, ink your stamp, use a scrap piece of paper to stamp once, then stamp again on your project without re-inking. (Do this again on a piece of Neenah white card stock that will be used for the sentiment and set this aside – see second picture above). Attach the first piece of stripe-stamped Neenah white to a piece of basic black card stock. Attach 2 pieces of Altenew Gold Washi Tape, spread apart to be able to show outside the created panel just made to a Neenah white card base. Glue the panel onto the Neenah white card base between the pieces of washi tape. Glue some Silver Glitter to the middle of the colored flower, attach the fussy cut vase and flower to the panel front using foam tape. Retrieve the second piece of stripe-stamped card stock, cut down to size, stamp the Thank you image from Altenew Wild Hibiscus stamp set in Permanent black in. Glue to piece of black card stock. Using foam tape, attach to card front as shown on first picture of the card.
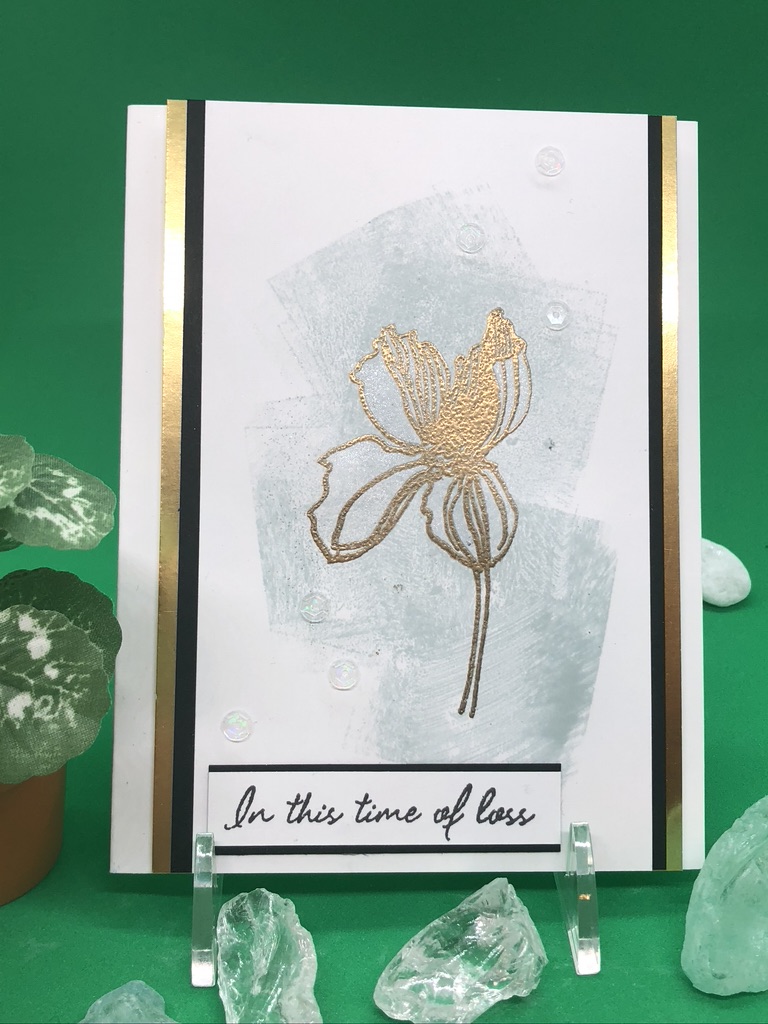
CARD TWO: IN THIS TIME OF LOSS
- Stamp Sets:
- Altenew Wild Hibiscus Stamp, Altenew In My Thoughts stamp set.
- Inks:
- Altenew Jet Black Crisp Ink, Altenew Misty Morning Crisp Dye Ink, Stampin’Up! Gold embossing powder, Versamark Watermark Stamp pad.
- Card stock:
- Basic Black, Neenah white card stock, Stampin’Up! Gold Foil sheet
- Other supplies:
- Sectrum Noir Sparkle Crystal Clear, foam tape, 5mm clear sequins, clear stamping block.


Apply the Misty Morning Crisp Dye ink to the center of a clear stamping block, careful not to ink the edges of the block as this gives a different look. I then stamped the ink directly to the panel of Neenah white card stock. You can also spritz with water first which gives a different look. Try both, see what you like. I stamped this block image several times. I then stamped the flower image over the center of this inked pattern using Versamark Ink, then heat embossed with gold embossing powder. I colored the flower with Spectrum Noir Sparkle Crystal Clear. It is difficult to see here (second picture above) but is stunning. I attached this panel to a panel of basic black card stock with glue, then glued this to a piece of Gold foil sheet. This is attached to a card base of Neenah white card stock. I stamped the sentiment on a thin piece of Neenah white card stock, glued that piece to a strip of black card stock and attached this with foam tape to the card front. The last step is adding clear sequins to the front panel.
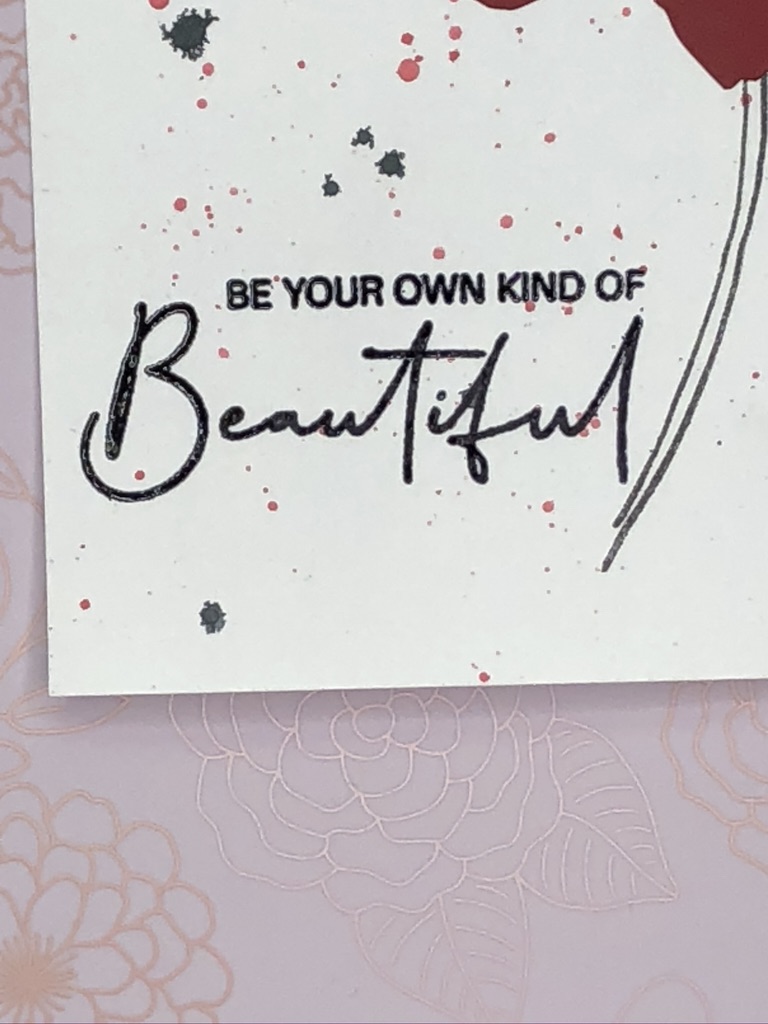
CARD THREE: BE YOUR OWN KIND OF BEAUTIFUL

Don’t we all need to hear this more?
- Stamp sets:
- Altenew Wild Hibiscus stamp set, Altenew Clematis Stamp Set
- Inks:
- Altenew Permanent Black Crisp ink, Stampin’Up! Cherry Cobbler, Versamark Watermark Stamp pad, Black embossing powder
- Card Stock:
- Neenah white card stock, basic black card stock, Stampin’Up! Cherry Cobbler card stock.
- Other supplies:
- Iridescent Ice Glitter, Spectrum Noir Sparkle Crystal Clear pen, foam tape, diamond rhinestones, paint brush
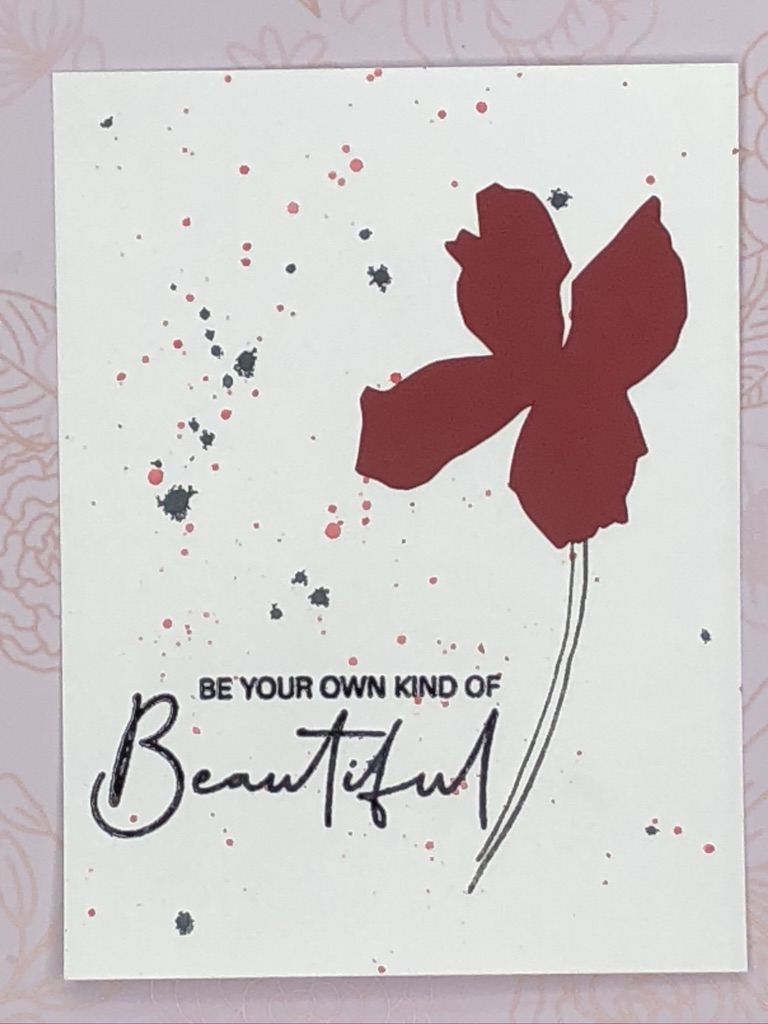


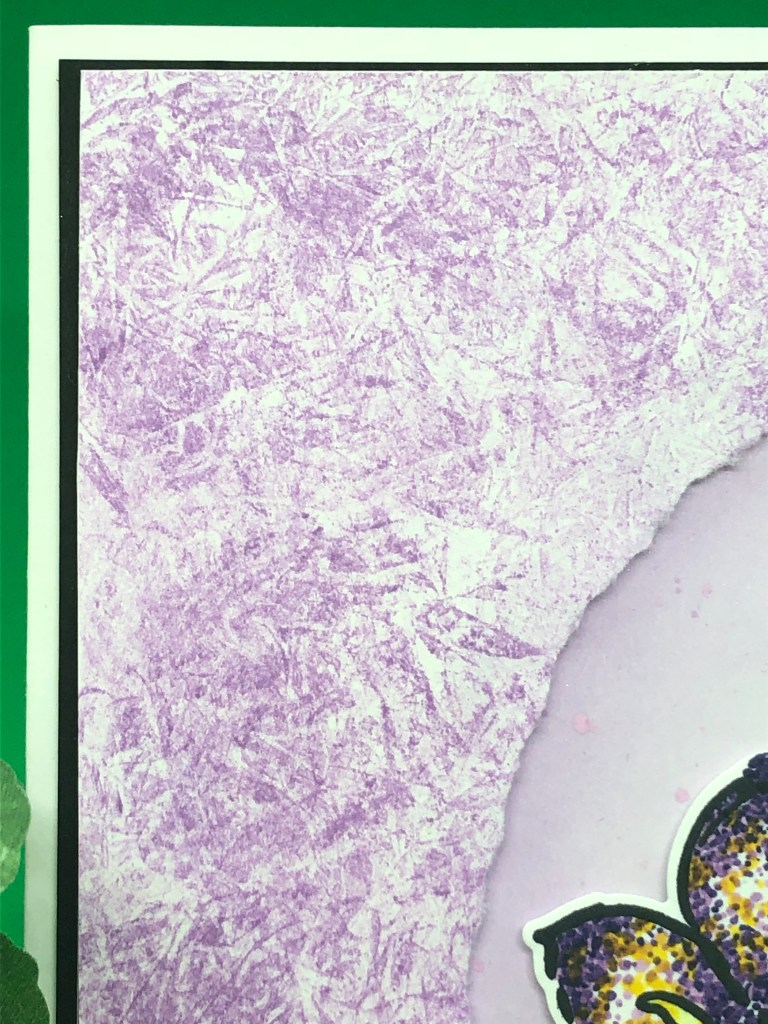
Using a non-absorptive surface such as glass, a plastic sheet or a craft sheet, stamp the black ink several times in one area. Spritz water over the stamped area. With a wet paint brush, pick up some of this ink mixture. Hold the paint brush a couple inches above your paper, tap the paint brush to spatter the ink. Cover the paper but don’t overdue. Allow to dry. Repeat the process with the Stampin’Up! Cherry Cobbler ink and allow to dry. Once the ink is dry, stamp the flower from Wild Hibiscus stamp set onto the panel. To create the red flower, I stamped the flower image on a non-absorptive surface. I like to use a rubber mat. Before the ink is dry, place your Cherry Cobbler card stock over the stamped image and press. This creates a “reverse” of the image on the Cherry Cobbler card stock – be careful not to smudge. Fussy cut this image out. This is done so you don’t have stamp lines on the Cherry Cobbler flower, which serves as the shadow to this flower. Attach this flower over the stamped flower image in the card panel. Stamp the flower again onto a scrap piece of Neenah white card stock and fussy cut it out. Attach the flower using foam tape. Put it just off the Cherry Cobbler flower so the Cherry Cobbler flower shows through as a shadow. Color the flower using the Spectrum Noir Sparkle Crystal Clear pen. Using glue, attach silver glitter to the center of the card. Attach the finished panel to black card stock using glue, attach this panel to a Neenah white card base.
Break Time…you know the drill…
CARD FOUR: NOTHING LIKE A MOTHER’S LOVE
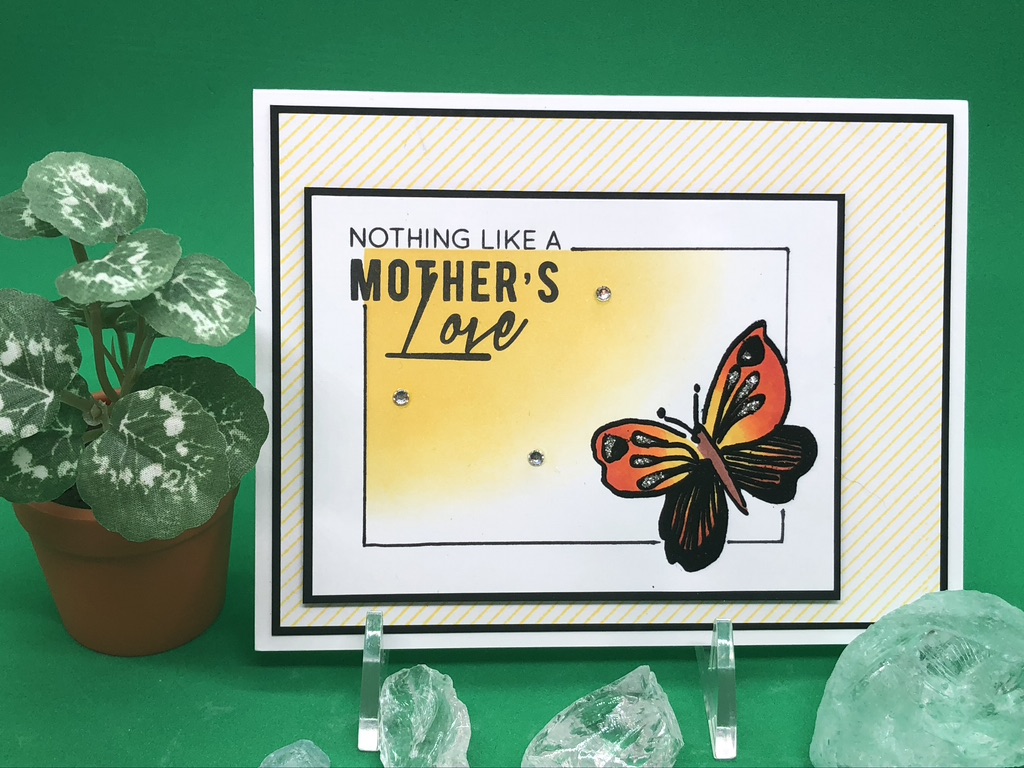
I chose this one to do after a break as there are some details to the creation that need attention…it’s a stamp technique you’ll use over and over though!
- Stamp Sets:
- Altenew Wild Hibiscus Stamp Set, Altenew Pinstripe stamp set.
- Inks:
- Altenew Permanent Black Crisp ink, Versamark Watermark stamp pad, Altenew Honey Drizzle Crisp Dye Ink, Altenew Maple Yellow Crisp Dye Ink, Altenew Fresh Lemon Crisp Dye Ink, Copic: Y15, YR04, YR07, E17, a 0.5mm fine tip black marker.
- Card stock:
- Neenah white card stock, basic black card stock
- Other supplies:
- foam tape, Sliver Glitter, Quilter’s Plastic Template grid sheets, diamond rhinestones
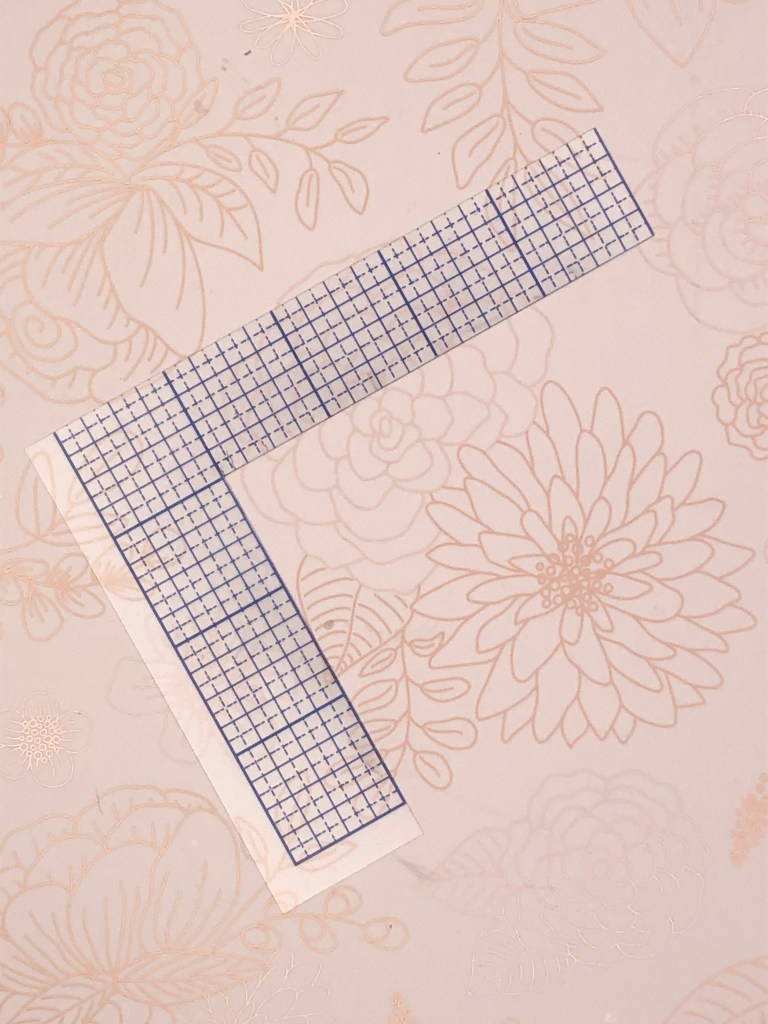
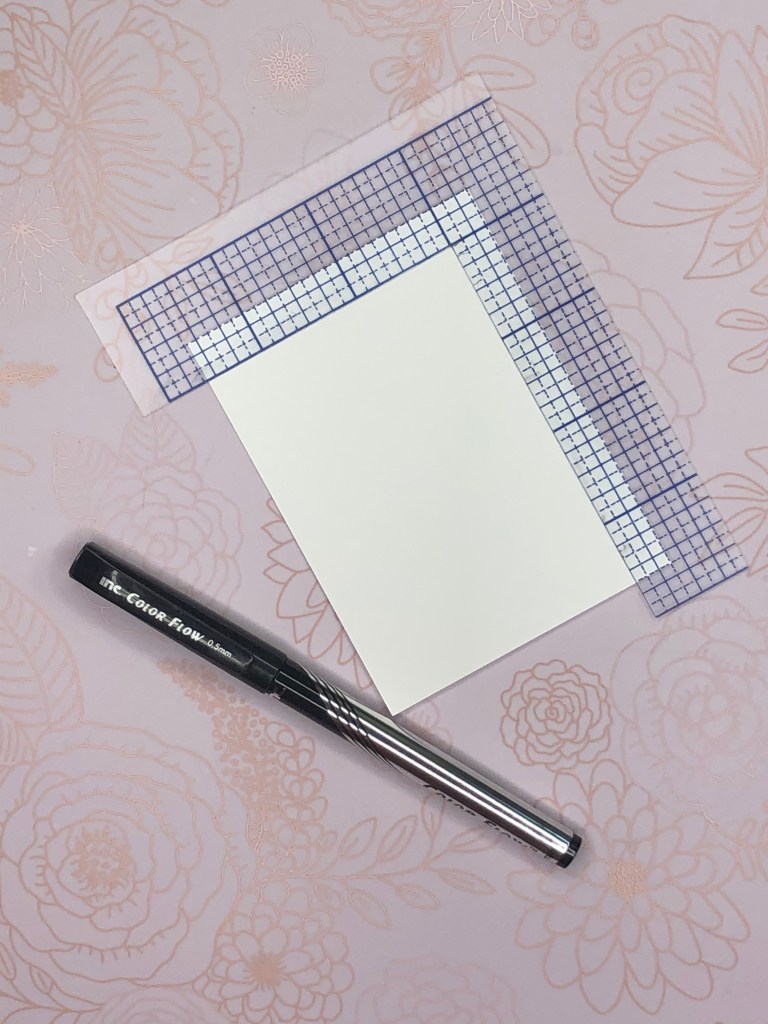
You will be using a piece of the Quilters grid that you create to look like the one on the left. You will use this to create the black lines around the sentiment and butterfly panel. You can see the grid is set down 3 squares in from each edge (above right). Before making the lines, we need to do some stamping and ink blending: Using your piece of Neenah white card stock (I typically use a 4″ x 3″ card stock with this technique), place both the butterfly and the sentiment in a MISTI so the sentiment will be in the upper left corner and the butterfly in the lower right corner.
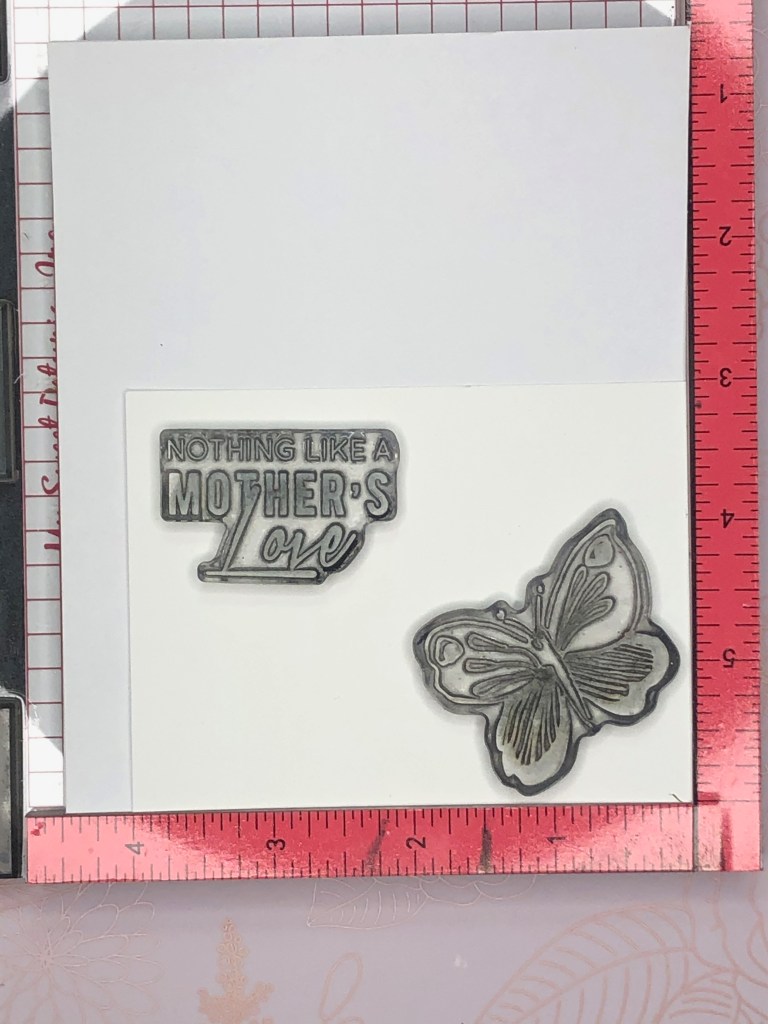

Make a light mark with a pencil where the sentiment edge is. This will be a guide to where you draw your first lines. Either erase before making the lines or do not draw over the mark as this makes them permanent. I typically mark right to the edge of the stamp image and draw the lines starting just outside the mark. This is one of those things that is an “Ah…I get it” once you see it done. Watch for the upcoming video…


Using the grid for a guide, draw your first lines as seen in the first image. Draw from the pencil line to 3 grid blocks from the opposite Neenah white panel edge. Mask the lines as shown then blend in the yellow colors, starting with the darker color and blending out to white. **TIP**: when blending, lightly stamp-off your inked blending tool or start off the paper and blend into the area that will be on your card. This keeps the ink even without those blotchy marks we often fight to avoid. Once the blending is done, put the card stock back in the MISTI, stamp in Altenew Permanent black in, and complete the lines.


The left picture shows the lines completed, in fact the whole panel is finished in this image. You may wonder “why not stamp the image and then blend?”. No matter how permanent ink is, it is not perfectly permanent. This extra step prevents the black ink from smearing. After the butterfly is colored with the Copic markers, put the panel back in the MISTI, stamp the butterfly with Versamark and emboss with black ink. Embossed images damage Copic marker tips so be sure to emboss as your last step.
Attach this panel to an piece of black card stock. Set aside. Using the Altenew Pinstripe stamp, stamp onto an over-sized piece of Neenah white card stock in Altenew Maple Yellow Crisp Dye Ink, cut down to size, attach with glue to black card stock, attach with glue to Neenah white card base. Attach the butterfly panel to the lower left corner of the card using foam tape.
CARD FOUR: FOREVER GRATEFUL
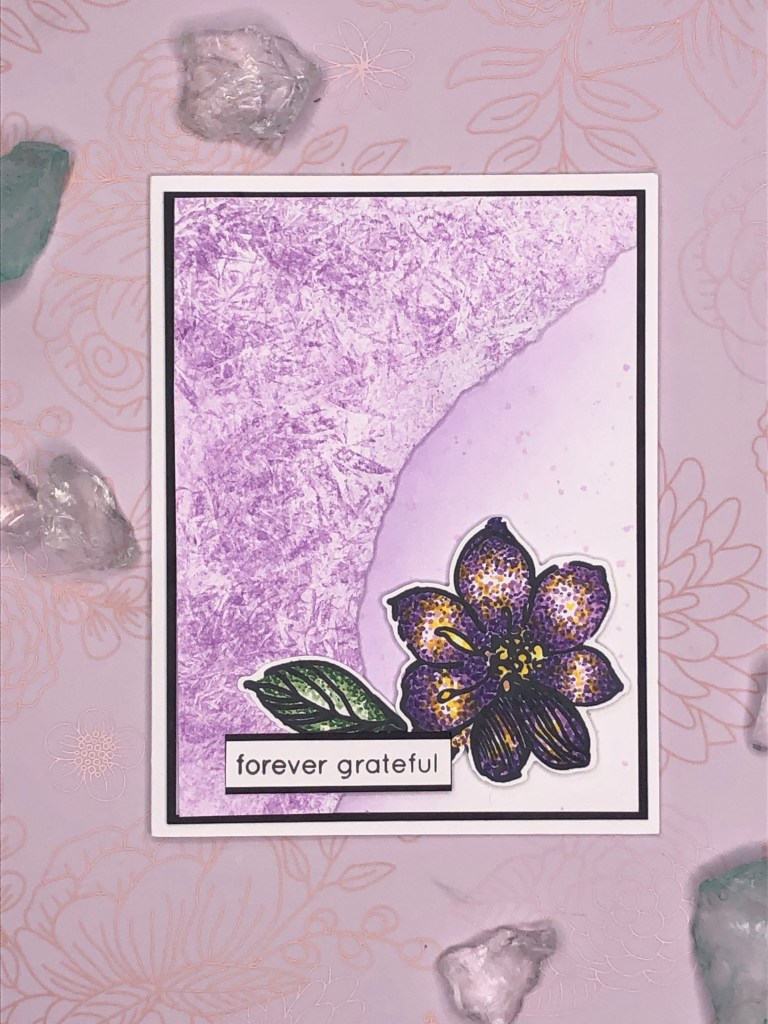
- Stamp sets:
- Altenew Wild Hibiscus Stamp Set
- Ink:
- Altenew Deep Iris Crisp Dye Ink, Altenew Lavender Fields Crisp Dye Ink, Momento Black ink, Copic: V12, V15, V17, BV08, G21, G24, Y00, Y15.
- Card Stock:
- Neenah white, Basic Black
- Other supplies:
- Plastic wrap, ink blending brushes, foam tape
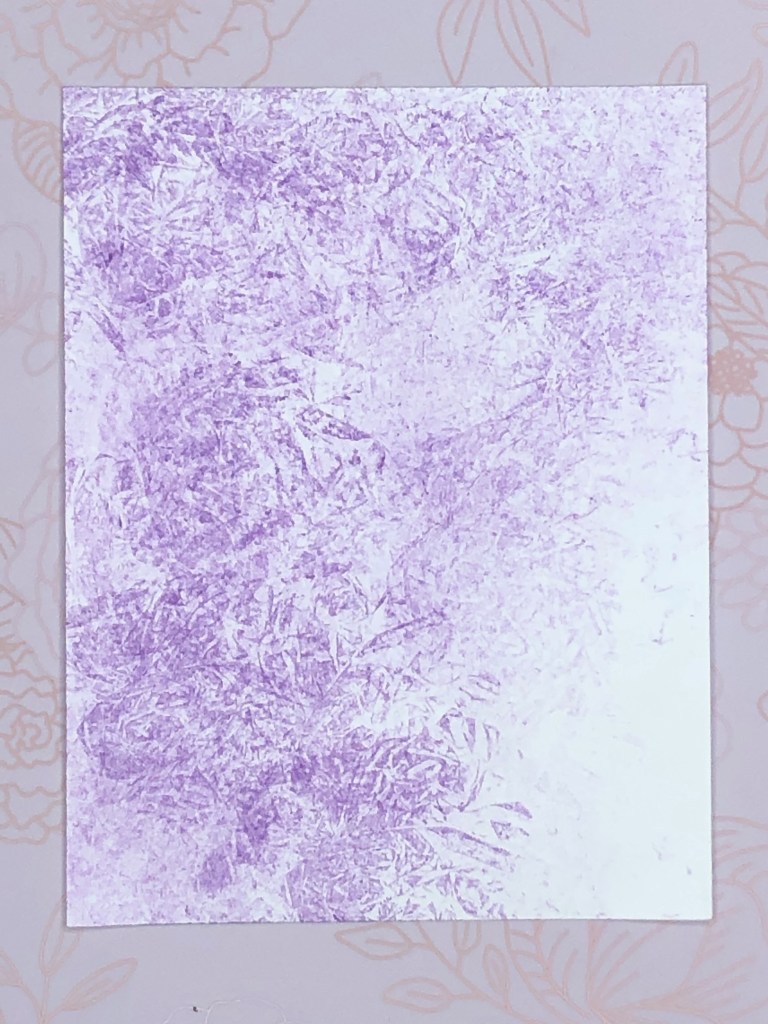


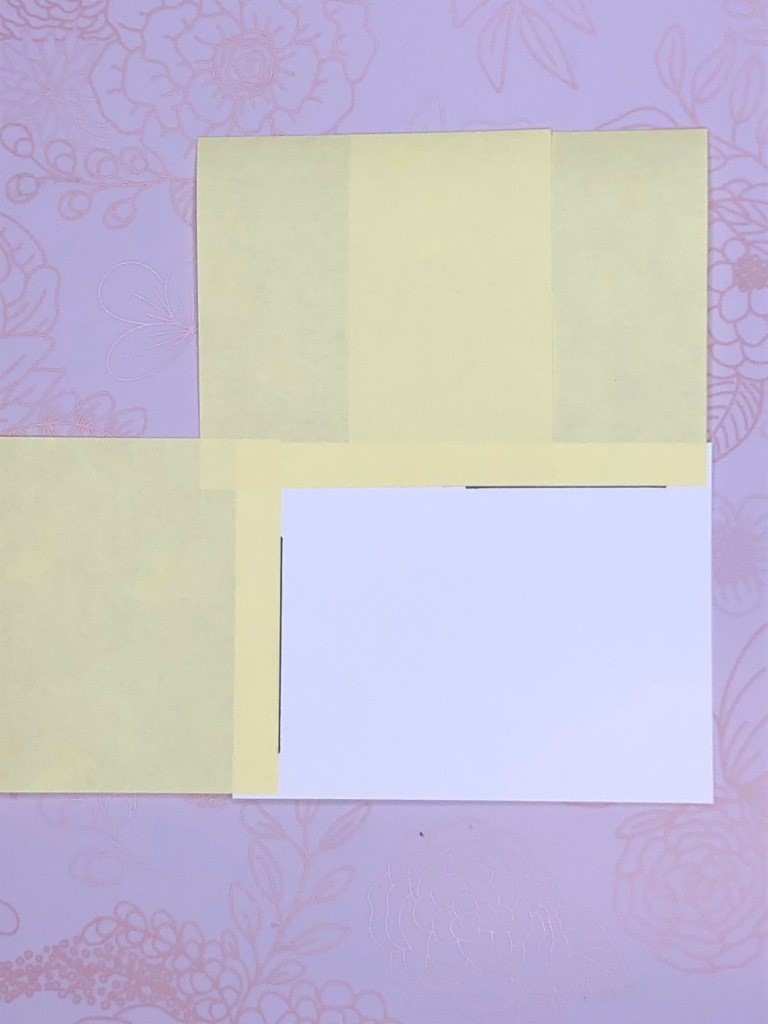
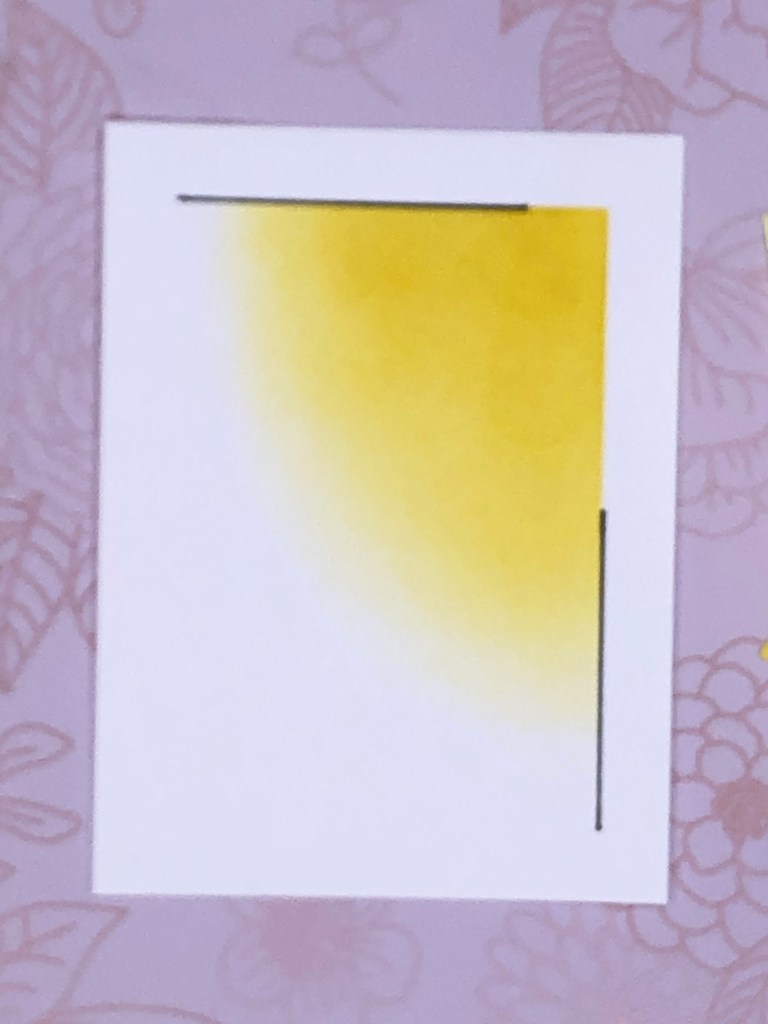
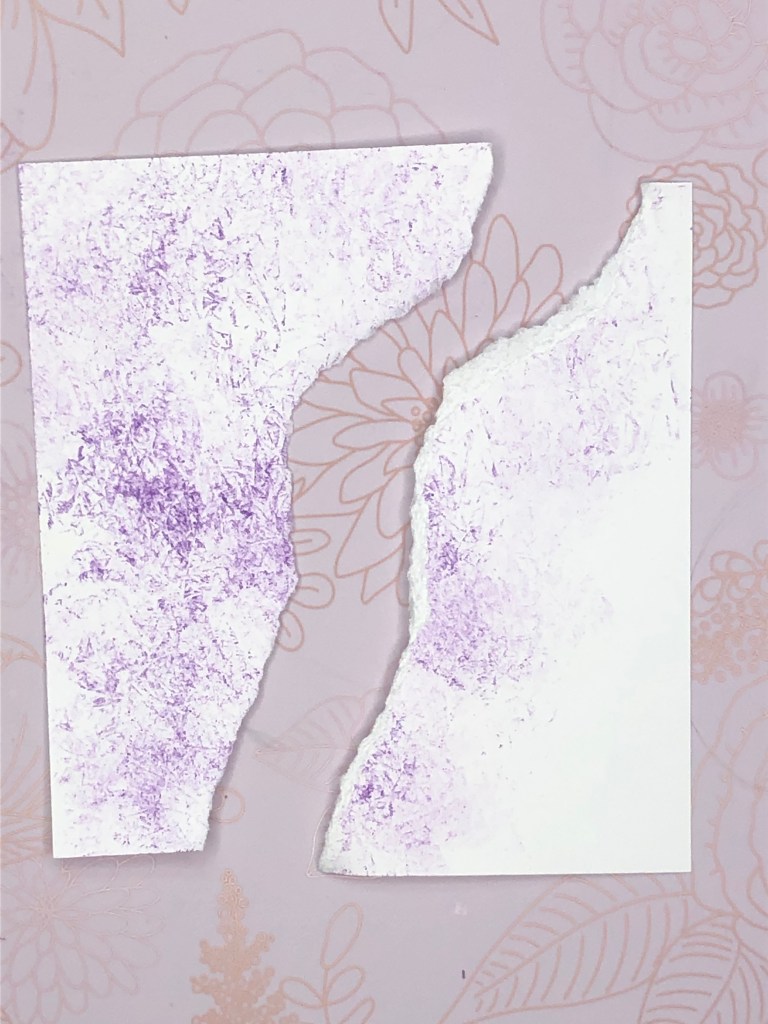
Using a non-absorptive surface, stamp out some Altenew Deep Iris Crisp Ink. Take an approximately 10″ x 10″ piece of kitchen plastic wrap and scrunch it up loosely. You will hold this with your fingers and use it to pick up ink off the non-absorptive surface. Lightly dap dap dap on your card stock, re-inking when needed, until your Neenah white card panel is mostly covered. The lower right corner will be torn off so no need to cover. The third photo above shows a close up. Take this panel and tear off the lower right half starting from the right upper corner down to the approximately middle of the lower edge (see below). You will take this piece you have torn off (right side of the torn card stock) and use it to draw a line which you will use for you blending guideline. See below:
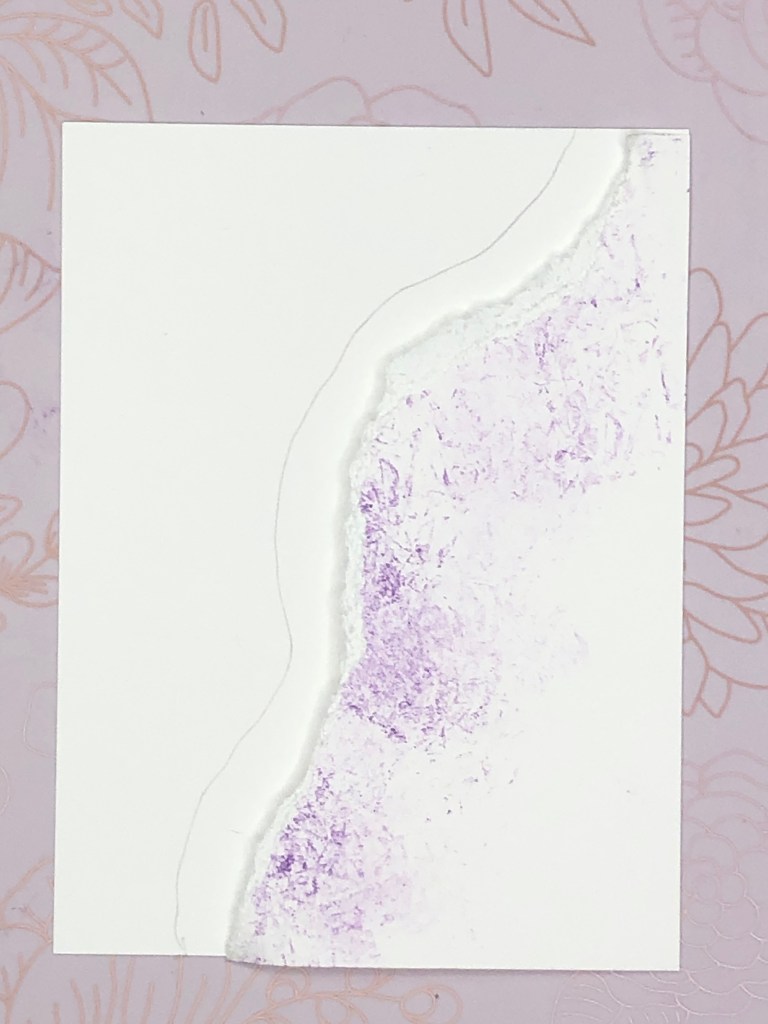
You will not need to erase this line as it will be under the inked panel you have created. When blending is complete (done in the Lavender Fields Crisp Dye Ink) spatter some Lavender Fields Crisp Dye Ink to the blended card panel. Attach the saved torn off colored card stock to the blended card stock with foam tape. Color the flower and die cut it. Attach with foam tape. For this flower I used a technique called Pointillism. It is done making small colored dots with the Copic Markers to get the effect seen on the above flower and leaf. Stamp the sentiment “forever grateful” on a piece of Neenah white card stock, cut to size. Attach to a piece of black card stock and glue to card front. Attach the completed panel to black card stock with foam tape, then glue the panel to a card base of Neenah white card stock.
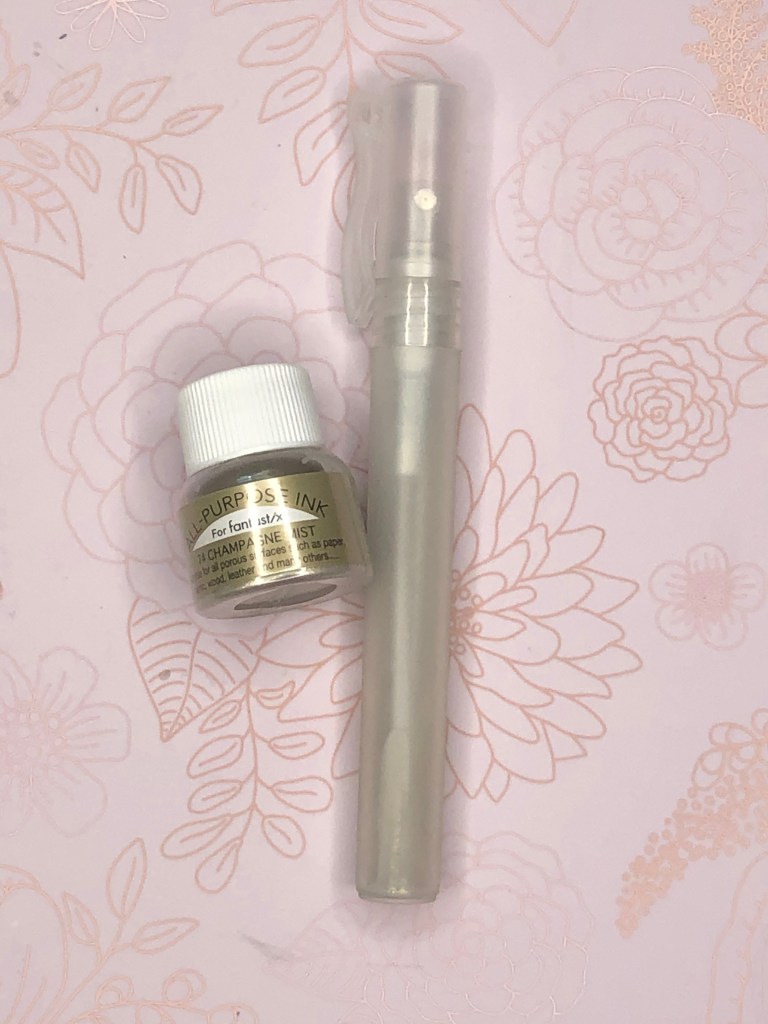
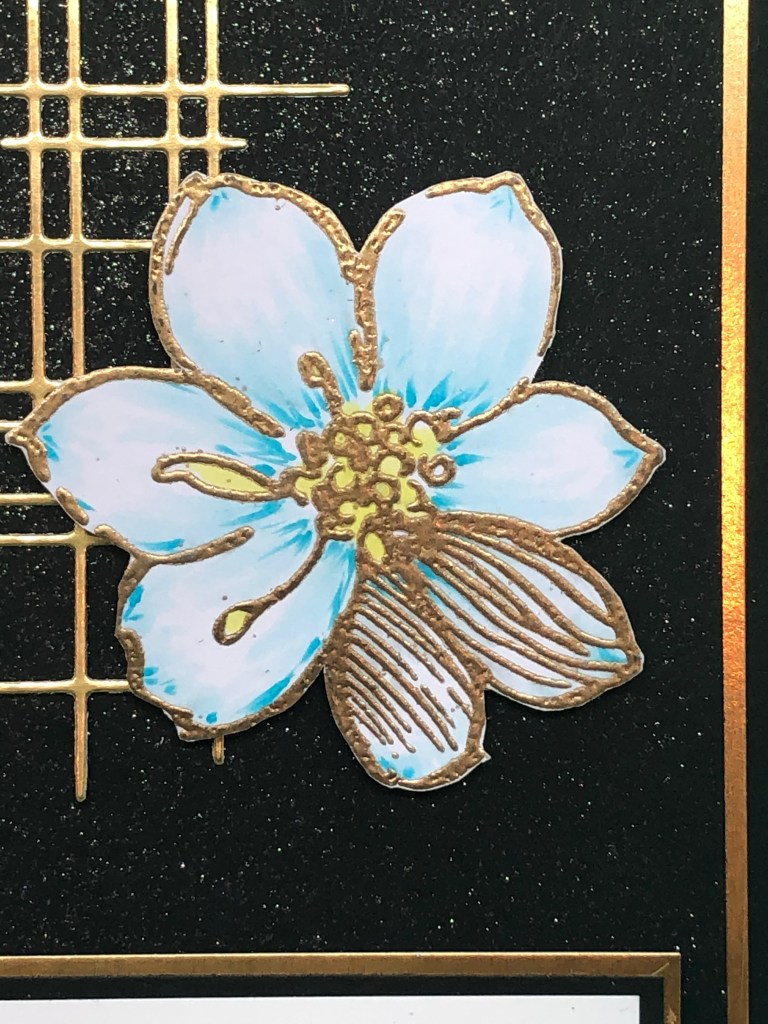
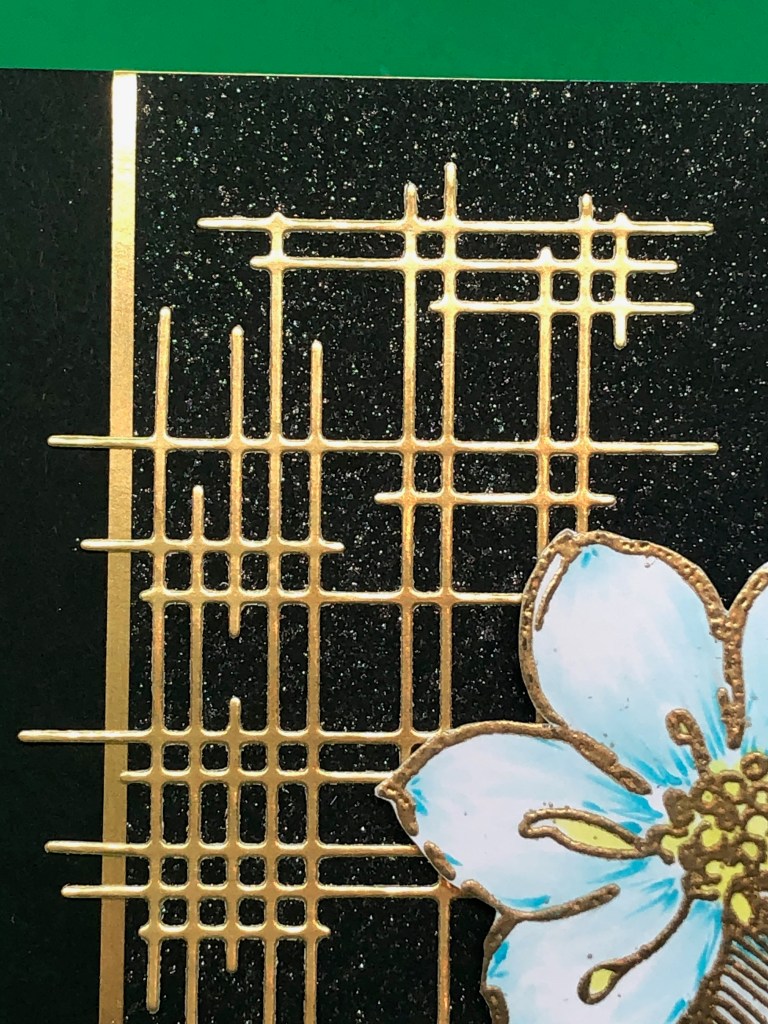
CARD SIX: BLACK HAPPY BIRTHDAY CARD
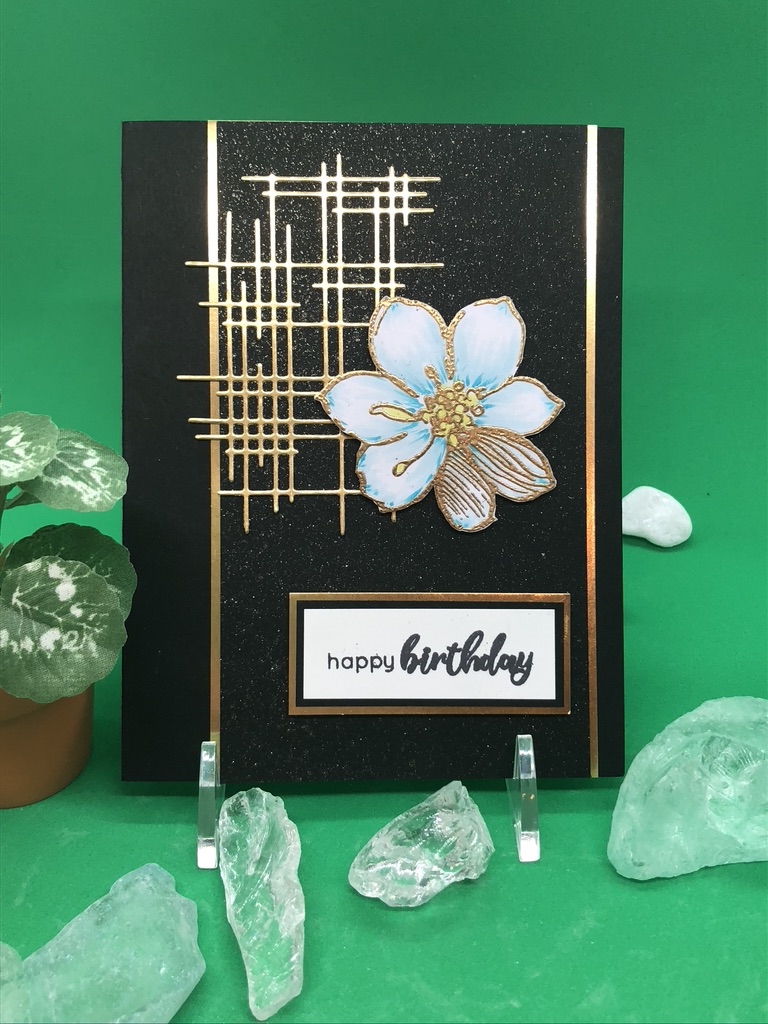
- Stamp set:
- Altenew Wild Hibiscus Stamp, Altenew Dotted Blooms
- Inks:
- Altenew Permanent Crisp Ink, Copic: Y02, BG000, BG01, Champagne Mist All Purpose Ink, Gold embossing powder, Versamark Watermark Stamp pad.
- Card stock:
- Stampin’Up! Gold Foil Sheet, Basic Black card stock, Neenah white card stock.
- Other supplies:
- Altenew Linear Crossroads Die, Mini-mister, 70% Isopropyl Alcohol, foam tape.
I’m ending with a card that I feel is the most stunning of the group. It is also relatively simple so I encourage you to CASE it.
Start by preparing a mixture of 10-15 drops of Champagne Mist All Purpose Ink and 70% Isopropyl Alcohol in a mini-mister (above right picture). Spritz this onto a black card panel. Let dry. Using the Linear Crossroads Die, die cut the lattice piece from Gold Foil Sheet. glue to the prepared misted panel. Using a MISTI, stamp the flower in stamped-off Altenew Permanent Black ink to create a light image of the flower. Color the flower. Emboss the flower with Gold embossing powder and fussy cut. Attach to the panel with foam tape. Stamp the sentiment in black ink and cut to size. Attach with glue to black card stock and then to gold card stock. Attach to card front with foam tape. Attach this created full panel to a panel of Gold Foil sheet and attach to a black card base.
That is the complete set of feminine cards. I hope you enjoyed this, survived the long post, and learned a little something along the way.
PART THREE: GIFT PACKING


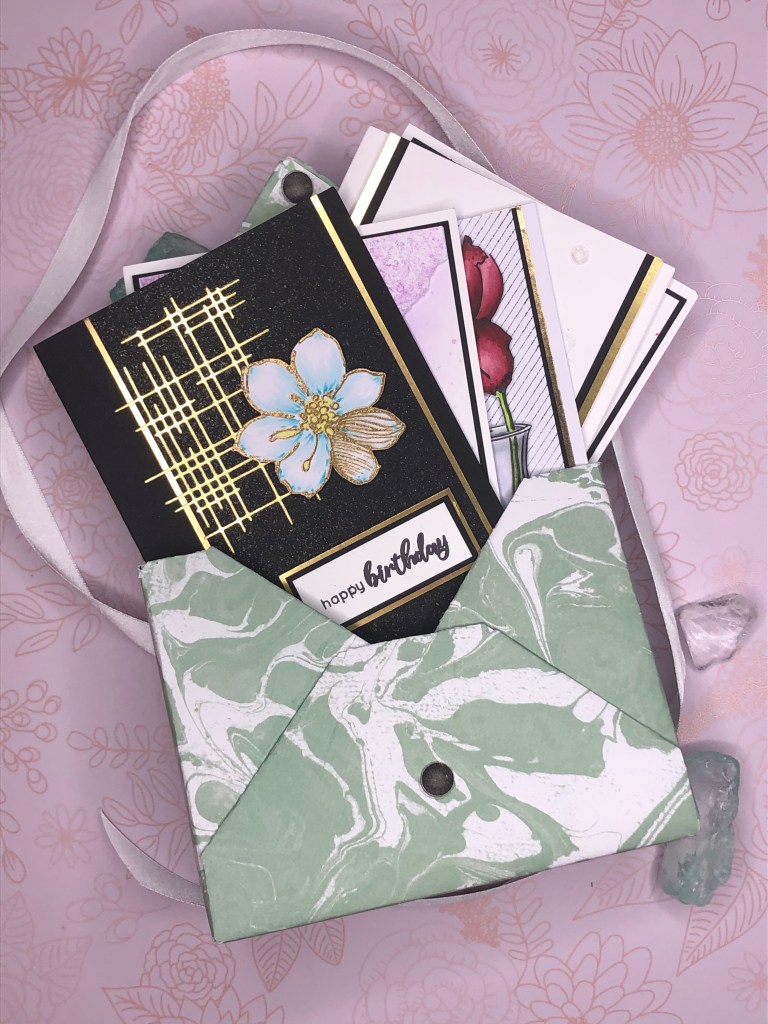
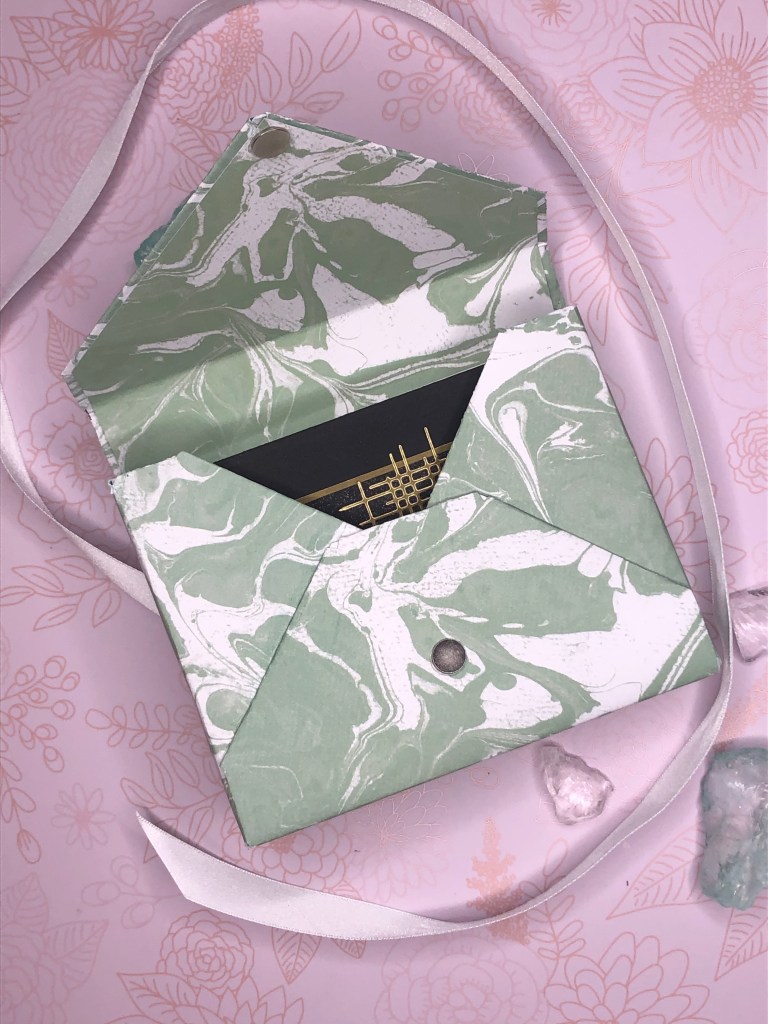

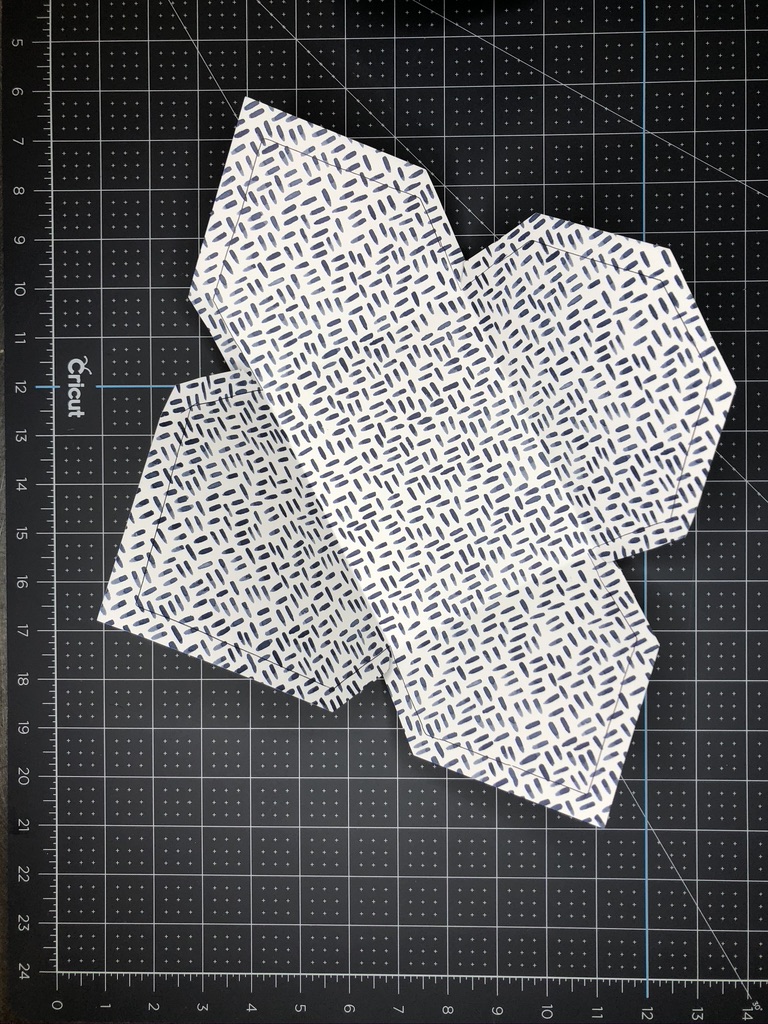
I used a piece of thin cardboard that came in some designed paper packaging. This cardboard was used to make the box. The box is 1″ thick and perfectly holds 5 cards and envelopes. There is a magnet attached to the box and the lid to keep it closed. You can best see this in the middle picture. I tied each box with a ribbon. I played with making a belly band and/or putting decoration on the box…in the end the ribbon was just elegant and perfect.
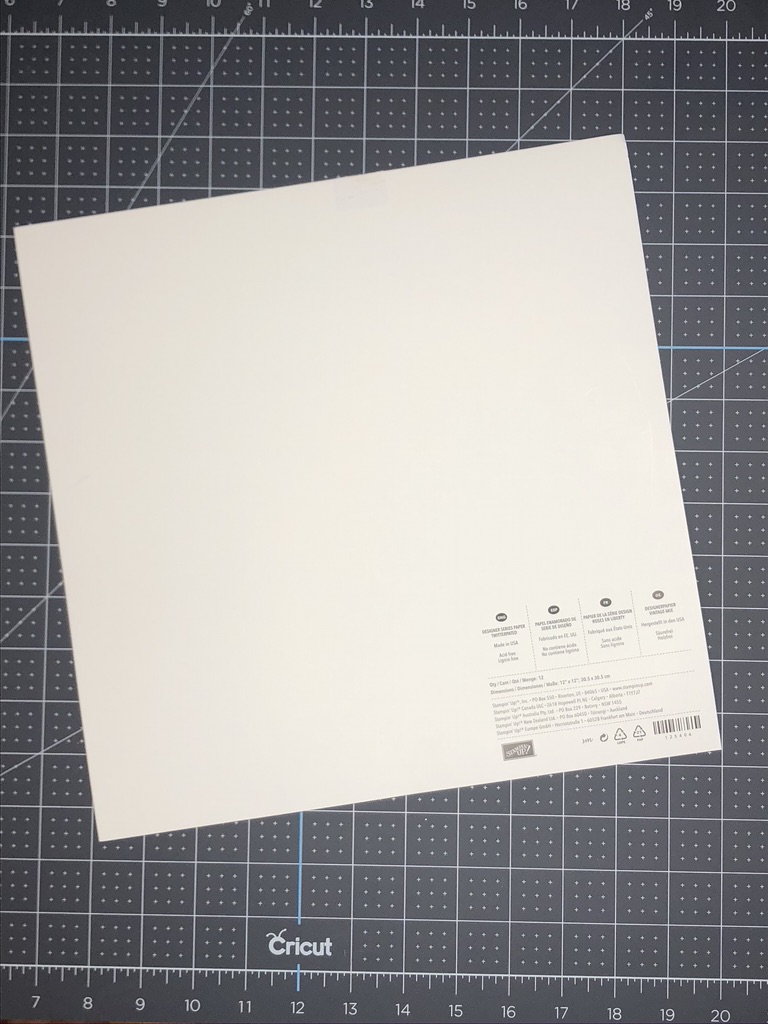
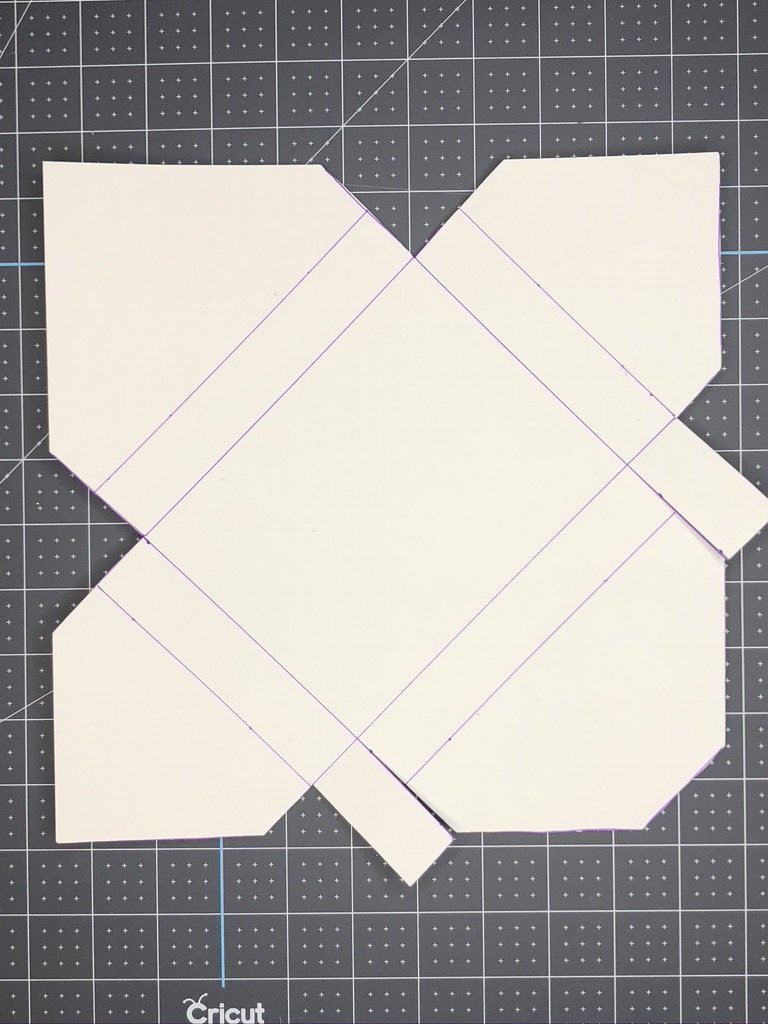
The picture above on the left is the cardboard used for the box. The picture on the right is the template. Once the template is drawn onto the cardboard and the cardboard is cut, I then covered the box with pattern paper. I am going to include instructions for the box – if followed as printed you should be able to make a box of your own.
Instructions:
Start with making a template. Use a 10 7/8” x 10 7/8” piece of paper to measure out your template, following the instructions below. Keep as your template.
Measure and draw a line that is 3/4” from one edge. Choose another edge on either side that shares a corner with this side, draw a line 3/4” from the edge. These two lines should cross at one corner.
Move the template to a diamond and consider each corner as a clock: 12 o’clock, 3 o’clock, 6 o’clock, 9 o’clock. Have the corner with the crossed lines be 6 o’clock.
From 12 o’clock to 3 o’clock:
Measure 4 1/8” from 12 o’clock corner toward the 3 o’clock corner – make a mark (mark 1)
Measure 5 1/2” from the 12 o’clock corner toward the 3 o’clock corner – make a mark (mark 2)
Measure 6 7/8” from the 12 o’clock corner toward the 3 o’clock corner – are a mark (mark 3)
Staring at mark 2, measure 1 3/8” toward the inside of the clock, keeping this measurement perpendicular to the edge of the page. Make a mark (mark 4)
Draw a line from mark 1 to mark 4
Draw a line from mark 3 to mark 4
From 12 o’clock to 9 o’clock:
Measure 4 1/4” from the 12 o’clock corner toward the 9 o’clock corner – make a mark (mark 5)
Measure 5 1/2” from the 12 o’clock corner toward the 9 o’clock corner – make a mark (mark 6)
Measure 6 7/8” from the 12 o’clock corner toward the 9 o’clock corner – make a mark (mark 7)
Starting at mark 6, measure 1 3/8” toward the inside of the clock, keeping this measurement perpendicular to the edge of the page. Make a mark (mark 8)
Draw a line from mark 5 to mark 8
Draw a line from mark 7 to mark 8
From 6 o’clock to 9 o’clock:
Measure 3” from 9 o’clock toward 6 o’clock – make a mark (mark 9)
Measure 4 1/2” from 9 o’clock toward 6 o’clock – make a mark (mark 10)
Measure 3 3/4” from 9 o’clock to 6 o’clock – make a mark (mark 11)
Measure 6” from the 9 o’clock to the 6 o’clock – make a mark (mark 12)
Measure 5 1/4” from the 9 o’clock to the 6 o’clock – make a mark (mark 13)
From mark 11, measure 3/4” toward the clock face, keeping line perpendicular to the line between 9 o’clock and 6 o’clock – a mark (mark 14)
From mark 13, measure 3/4” away from the clock face, keeping line perpendicular to the line between 9 o’clock and 6 o’clock – make a mark (mark 15)
Draw a line from mark 9 to mark 14
Draw a line from mark 10 to mark 14
Draw a line from mark 10 to mark 15
Draw a line from mark 12 to mark 15
Measure 8 3/4” from 9 o’clock to 6 o’clock – make a mark (mark 16)
From 3 o’clock to 6 o’clock:
Measure 3 1/8” from 3 o’clock to 6 o’clock – make a mark (mark 17
Measure 3 7/8” from 3 o’clock to 6 o’clock – make a mark (mark 18)
Measure 4 1/2” from 3 o’clock to 6 o’clock – make a mark (mark 19)
Measure 5 1/4” from 3 o’clock to 6 o’clock – make a mark (mark 20)
Measure 6” from 3 O’clock to 6 o’clock – make a mark (mark 21)
From mark 18, measure 5/8” toward the clock face, keeping the line perpendicular to the line between 3 and 6 o’clock – make a mark (mark 22)
From mark 20, measure 3/4” away from the clock face, keeping the line perpendicular to the line between 3 and 6 o’clock – make a mark (mark 23)
Draw a line from mark 17 to mark 22
Draw a line from mark 19 to mark 22
Draw a line from mark 19 to mark 23
Draw a line from mark 21 to mark 23
Measure 8 3/4” from 3 o’clock to 6 o’clock – make a mark (mark 24)
Draw a line from mark 16 to mark 24
Making the fold lines:
From mark 10, measure 1 1/2” toward the clock face, keeping this line perpendicular to the line between 9 and 6 o’clock – make a mark (mark 25)
From mark 19, measure 1 1/2” toward the clock face, keeping this line perpendicular to the line between 6 and 3 o’clock – make a mark (mark 26)
Draw a line from mark 12 to mark 25
Draw a line from mark 21 to mark 26
Draw lines from these marks:
From mark 4 to mark 8
From mark 8 to mark 25
From mark 25 to mark 26
From mark 26 to mark 4
Measure out 1” from each of these lines and draw a line. This creates a box 1 inch deep. Look at the template above again to see the lines drawn.
You will now cut along the borders of the templates and around the “triangles” you have made on the template. This is your permanent template.
Once your template is made you will trace it onto a thin piece of cardboard or thick piece of card stock, draw the fold lines again. This will become your box.
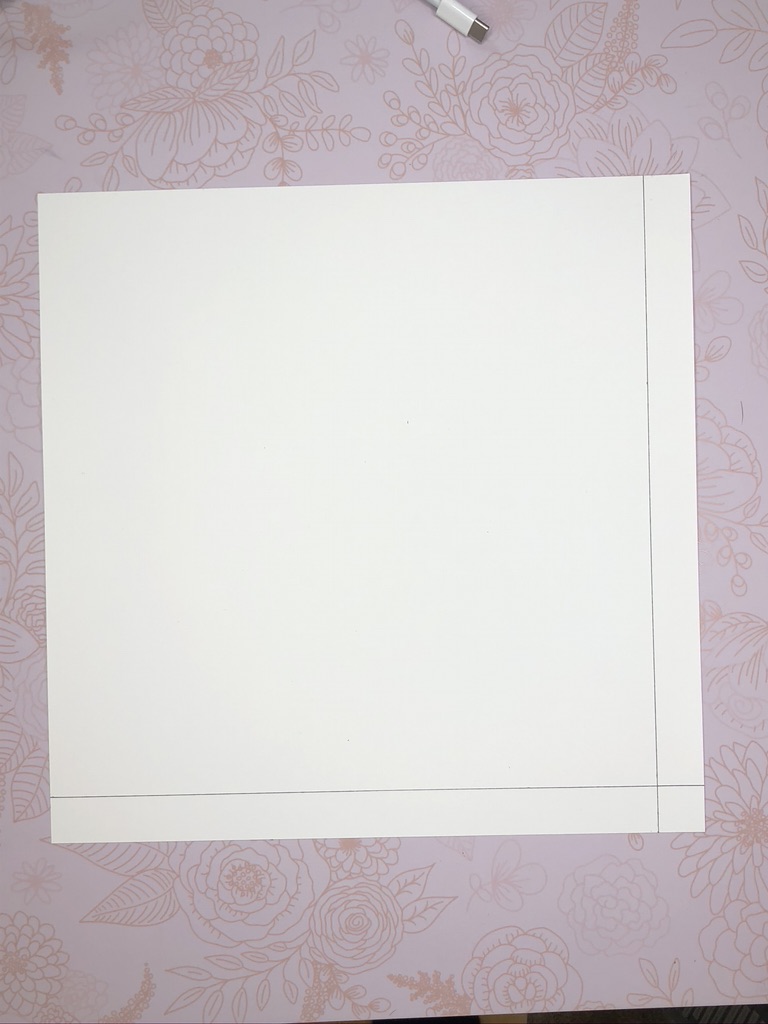
You will draw out another box from a 12 x 12 piece of pattern paper – this is the design paper you have chosen for the decoration of the box. See the photo above. Draw the lines on the opposite side you plan to have as the outside of the box. You will notice there is about an inch border left around the box pattern on this paper – this is so you have extra paper to wrap around the box edges.
Cut all fold and corner pieces as shown in the picture so you can “wrap” your design paper around your box.
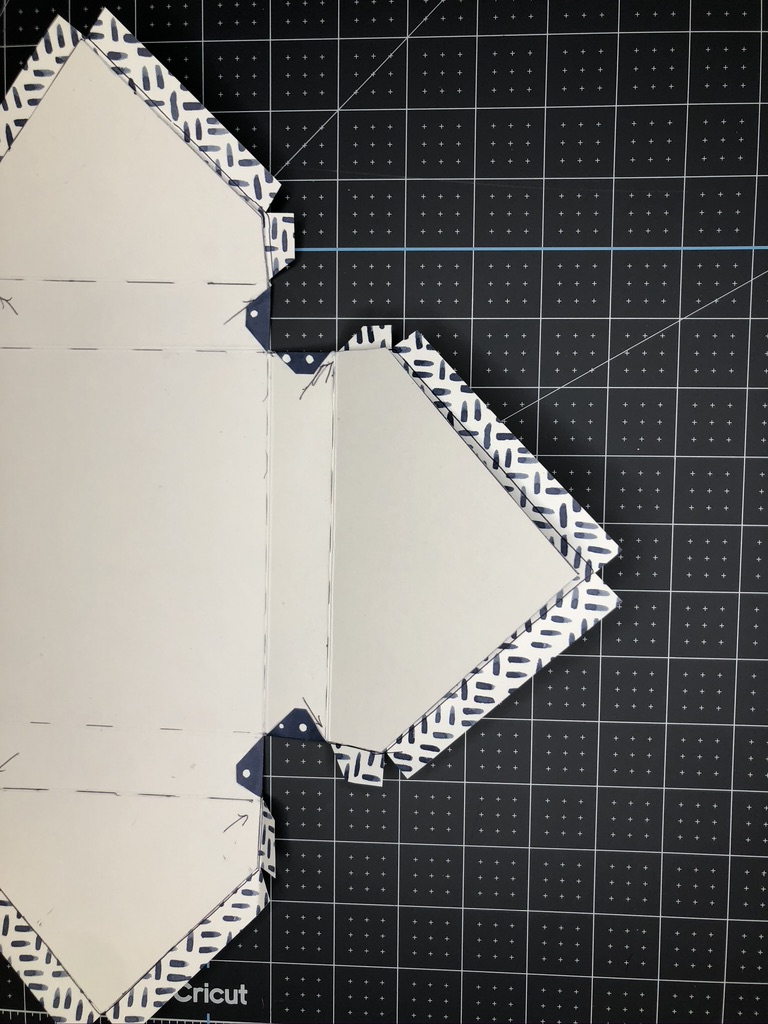
Glue the design paper to the box ONLY at the center square (see photo below). The design paper will need to be able to move with the box as you fold and glue the flaps down. The second picture below is for the inside box decor. Do not put glue on any of the flaps when attaching the designed paper. In the first picture below you will see design paper behind the box. This is your design paper which just happens to be behind the box in this picture.


When attaching the flaps (seen above these photos) fold the box into it’s final position before gluing the flap down. The paper will need to be a little bit bigger than the box or it will not fold into the shape of a box. Rather than worrying about the math to do this, just put each piece you are gluing into its folded place and glue it holding until stable. (This will be very obvious in a future video). Glue the box into its folded position. The flaps seen in the picture on the right help to hold the boxe shape.
Attach another piece of designed paper to inside of box glueing ONLY the top of the flap. Again, the design paper needs to be able to move as the lid of the box is opened and closed. You can see the flap of design paper on the inside of this box. You can also see the magnets glued to the flap and box to keep it closed.

Wrap and tie a ribbon around the box to present the gift.
PS: don’t forget to let the dog in and allow the family to come back home. Thanks for following my work. I do hope you find it educational, inspiring and enjoyable. Until next time…
Aimee

These look fantastic!! I especially love the packaging, it’s so adorable. You did a fabulous job, Aimee!! Way to go!
Thank you for submitting your work to the AECP assignment gallery.
LikeLike
Absolutely Awesome, love these collections!!!
LikeLike
You are a phenomenal talent! I love every single one of these!
LikeLike
Thank you Sharon. That means so much to me.
LikeLike
Stunning cards!
LikeLike
Thank you Lynn! I’m thrilled with the response.
LikeLike
aimee it’s wonderful! love your cards, as always!!
________________________________
LikeLike
Thanks Mickie
LikeLike
These are all so “cutting edge”. Blessings~~~ Alice
LikeLike
Very nice sis ,
LikeLike