To watch a video on how to make this card, click HERE
- SUPPLIES:
- Stamp Sets:
- Altenew Whimsical Flowers
- Altenew Everything About You
- Inks:
- Momento Tuxedo Black Ink
- COPIC C3, R29, Y08
- Black embossing powder
- White embossing powder
- Versamark Watermark Stamp Pad
- Card Stock:
- Neenah white card stock
- Black card stock
- Vellum
- Other:
- Rhinestone embellishments
- Heat gun
- Foam Tape
- Stamp Sets:
Hi all! It’s been a while. I am excited to announce that I’ve passed Altenew’s Level 2 Educator Certification Program. One more level and I’m officially an educator!! I’m so very excited, it has been a wonderful journey! Today’s card is the first card for Level 3. The reason it’s been a while is because life keeps getting in the way of my crafting…I know you all understand. My practice (I’m a Family Nurse Practitioner) was purchased by a large hospital organization in town. So we have gone from being a local small family practice clinic to being part of a large health care system. The learning curve has taken ALL MY TIME and, if I’m being honest, has been daunting. But I’m getting the hang of it, and I’m back to crafting…ahhhhhhhh, big sigh of relief!!!
OK, I hear you…back to the card… Have you heard of Zentangle? If you’ve been on Pinterest I’m sure you have. Zentangle is an American created drawing style. It was designed by a monk named Rick Roberts and an artist named Maria Thomas. Their goal was to design a drawing style that is a combination of meditation and art. I have wanted to learn Zentangle for a long time. Altenew has a course called Zentangle for Card Makers, taught by Amber Davis, which I decided to take as part of my Level 3 course work. This course is very inexpensive and so worth the time to watch. Amber does an amazing job teaching, and for those of you who love watercoloring, there is a section where she shows us her amazing watercoloring abilities.

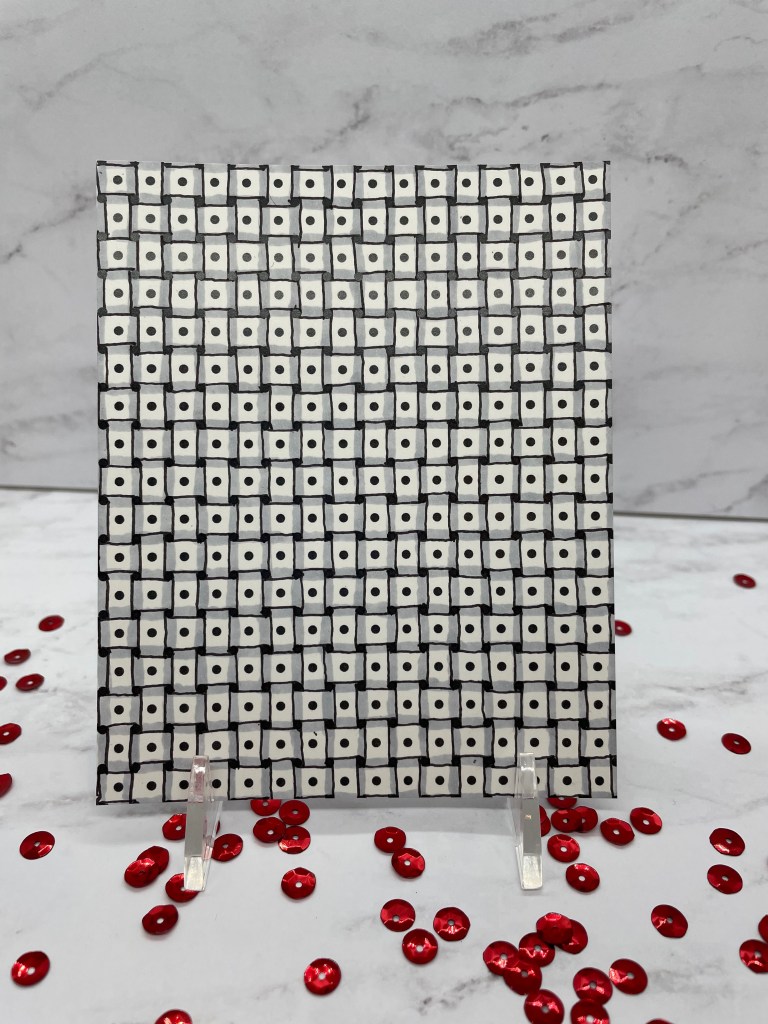
The image on the left is the true Huggins Zentangle design. The one on the right is the panel I made for this card…we’ll get to that in a moment. Amber Davis introduced this alteration of Huggins during her “Zentangle for Card Makers” course. The alteration is somewhat more simple than the true Huggins, which is one of the reasons I chose it. Much of this post will be talking about creating this design.

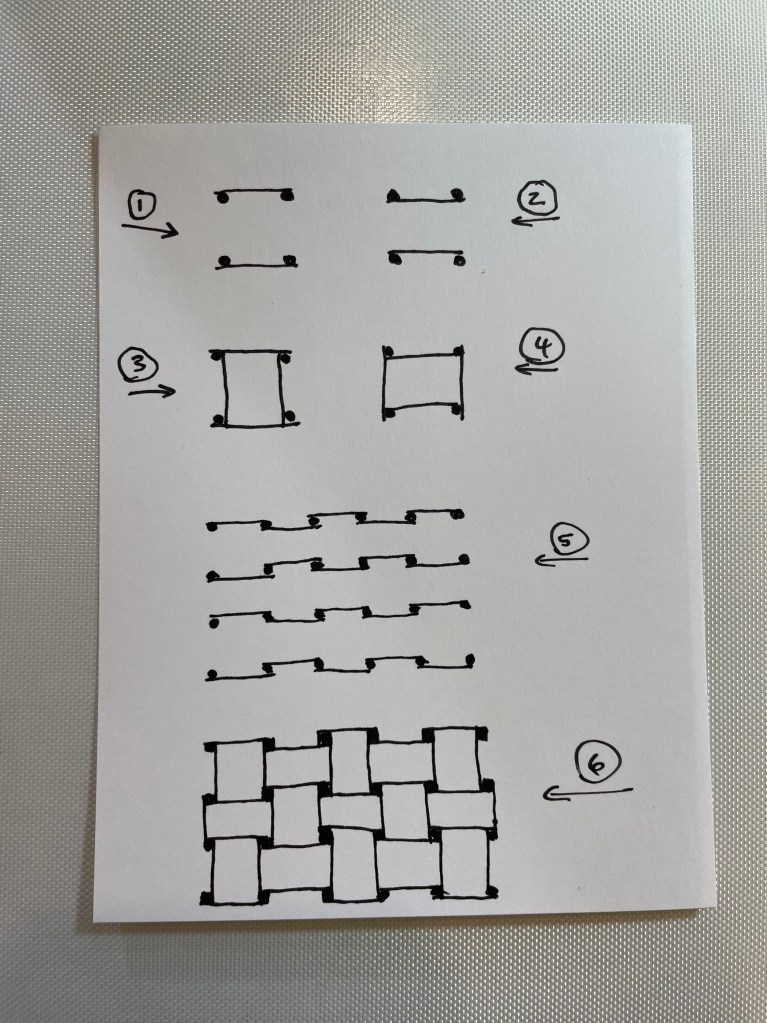
The picture on the left is the design paper I used to create this Zentangle design. You will notice every other line is offset from the line above it. In drawing this Zentangle, I skipped every other line, which then creates the dot in the middle of the design (see the completed card at the top of the post). To make demonstrating the “tangle”, the picture on the right breaks down the design on a larger dot scale and without the offset dots.
Please refer to the above image on the right, numbers one and two. When starting this design, draw a line either inside or outside the dots. If you draw outside the dots, the line below needs to be outside the dots as well (see image 1). If you draw the line inside the dots, the next line below needs to be inside the dots (see image 2). To continue the design, alternate inside the dots, outside the dots (see image 5). Once you have all the horizontal lines drawn (see image 5), turn you page 45 degrees to complete the pattern. The idea here is to create a rectangle, not a square. So, If you are at a point where the lines are outside the dots, draw the two lines to complete the rectangle inside the dots (see image 3). And the opposite, if your lines are inside the dots, then the completion lines are outside the dots (see image 4).

To shadow, use your shadowing of choice. I used Copic C3. Draw the shadow line along the long edge of the rectangle.
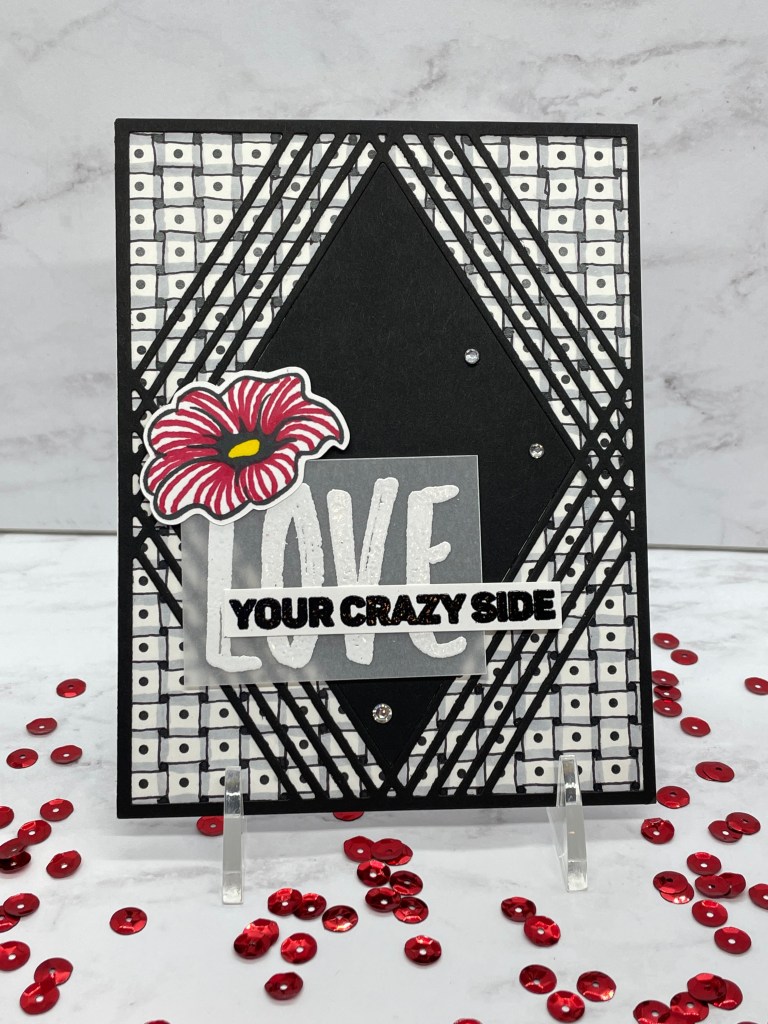
To complete the card, I used Altenew’s Diamond Frame Cover Die to die cut the image out of black card stock. This was glued to the Zentangle design. The center diamond shape was also glued back into the die cut image. The “LOVE”, from the Everything About You, is embossed in white onto Vellum and attached to the card using foam tape. The “Your Crazy Side” is embossed in black onto Neenah white card stock and is attached to the card by putting a little foam tape under the word “Side” and glue under the rest so it lays evenly on the card.

The flower is from Altenew’s Whimsical Flowers. I just love these flowers! They are playful and have a lot of depth to them even without coloring. In Zentangle, there is a concept called “aura”. To “aura” is to “trace around the inside or outside of a tangle”. If you have seen Zentangle designs, you have seen “aura” used in the drawing. The idea is to use the aura lines to create depth and direction of the image. So, with this flower, it is to emphasize the curves in the flower. Once done, the flower center is colored in COPIC Y08. Again, foam tape and glue are used to attach the flower to the card. The whole panel is then attached to a Neenah white card base.
I hope you enjoyed todays card. I sure enjoyed creating it, and LOVE that I am back in my craft room. In the process, I have learned a new love – Zentangle.
Aimee Pankau

WOW Aimee! this is soooo cool! gorgeous card!!!
LikeLike
Oh my god, Aimee! You have done a marvelous job!! Love this!
Thank you for submitting your work to the AECP assignment gallery.
LikeLike